


8
9
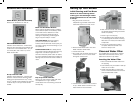
Setting Up Your Brewer
Initial Cleaning and First Brew
Perform an initial cleaning before
making your first beverage. Follow
these instructions but do not insert
a K-Cup
®
.
1. Plug the power cord into an
independent, grounded outlet. Press
the Power button to turn the unit on.
2. Press the Hot Water button. The Add
Water indicator will illuminate.
3. Lift the reservoir lid.
4. Pour water into the water reservoir until
it reaches the 10 oz. rim on the water
level guide. Close the lid.
5. Lift the brewer handle but do not add a
K-cup
®
. Water starts to drain from the
water reservoir into the brewer.
6. Wait until all the water has drained into
the brewer before lowering the brewer
handle completely.
7. Place mug on the drip tray.
8. The Hot Water button LED will remain
on, indicating that the water is heating.
After about 2 minutes, the water starts
to dispense.
9. The one-time cleaning process is
complete. Discard hot water. Your
brewer is ready to use.
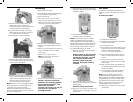
Charcoal Water Filter
Your coffeemaker comes with a charcoal
water filter that eliminates chlorine, bad
tastes and odors from tap water.
Inserting the Water Filter
1. Remove the filter and filter holder from
the polybag.
2. Soak the filter, fully immersed in cold tap
water, for 15 minutes.
3. Rotate the water filter compartment
cover counterclockwise to remove the
charcoal water filter holder.
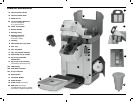
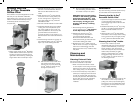
Buttons and Indicators
Power Button (does not illuminate)
Press to turn the Brewer on and off.
Add Water Indicator LED
Indicator will illuminate blue – Fill the water
reservoir with cold water until it reaches just
under the rim of the desired level – 6, 8, or
10 ounces (180, 235 or 300 mL) on the
Water Level Guide.
K-cup
®
Indicator LED
Indicator will illuminate blue – The blue light
flashes to indicate that the brewing head
needs to be opened and a K-Cup
®
or My
K-Cup
®
needs to be inserted
. The light will
continue stay on until you lift the brewer
handle.
Brew and Hot Water Buttons
When buttons are flashing blue it indicates
that a selection (Brew or Hot Water) needs
to be made. Once a selection is made
button is solid blue, indicating water is
heating and dispensing of beverage will
begin in approximately 2 minutes.
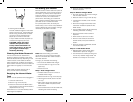
Your Next Brew When the brewing
process is complete, the Add Water
indicator LED will illuminate. At this point you
can begin making the next beverage, or you
can power off.
Automatic Shut-Off As a safety feature,
your brewer will automatically shut off at any
stage when it is idle for longer than 90
seconds. Press the power button to restart.
If it shuts off while the Brew button LED was
flashing blue, lift and lower brewer handle to
reset.
Drip Tray Overfill Indicator
Will pop up when excess coffee that does
not dispense into mug or residual
condensation from the brewing process fill
the drip tray.