


Electrical
requirements
Electrical Shock Hazard
l
Improper connectlon of the
equipment-grounding
conductor can result In a rlsk
of electrical shock. Check
wlth a qualified electrlcian or
service technician if you are
in doubt as to whether the
appliance Is properly
grounded.
l
Do Not use an extension cord
with this appilance. Such use
may result in a fire, electrical
shock, or other personal
injury.
A 120-volt, 60-Hz, AC only, 15-or-20
ampere, fused, electrical supply is
required. A time-delay fuse or circuit
breaker is recommended. It is
recommended that a separate circuit
serving only this appliance be
provided.
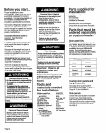
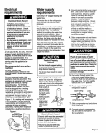
Recommended grounding
met hod
DO NOT, UNDER ANY
CIRCUMSTANCES. REMOVE THE
Powm suPPLY
LORD GROUNDING
PRONG.
For your personal safety, this
appliance must be grounded. This
appliance is equipped with a power
supply cord having a 3-prong
grounding plug. To minimize
possible shock hazard, the cord
must be plugged into a mating
3-prong, grounding-type wall
receptacle, grounded in accordance
with the National Electrical Code,
ANSI/NFPA 70-latest edition, and
local codes and ordinances. See
Figure 1. If a mating wall receptacle
is not available, it is the personal
responsibility and obligation of the
customer to have a properly
grounded, 3-prong wall receptacle
installed by a qualified electrician.
Figure 1,
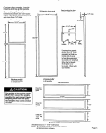
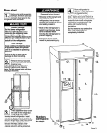
Water supply
requirements
Use only l/4” copper tubing for
water line.
The water line to the refrigerator
must provide 15-l 00 psi water
pressure.
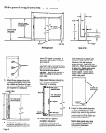
The preferred method of installing
the plumbing to the refrigerator is
through the wall. An optional
method is installing the water line
through a floor opening. If the
copper tubing is installed through
the floor, the hole cut in the floor
must be angled 45O toward the front.
You will need enough l/4”- copper
tubing to connect from water line to
refrigerator, a saddle-type valve and
a union. Rough in the water line
before installing the refrigerator. See
steps that follow.
Product/Property
Damage
Do Not Install copper tubing
In an area where temperatures
drop below freezing.
To do so may result In water
damage.
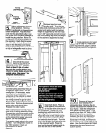
1
.Find a 3/8” to 1” vertical cold
water line near the refrigerator.
Measure the distance from the
cold water line to the refrigerator
location. Add 24 inches for the
final length of
copper tubing
you will need.
Cut both ends
of coDDer
tubing’square.
2.Tum off
main water
supply and
clear water
line.
I
Electric Shock Hazard.
Electric drill must be grounded
to prevent severe or lethal
shock if water is in line and
enters drill during use.
I
Failure to ground drill may
result In personal injury.
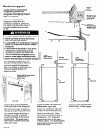
3. Ground electric drill or use a hand
drill. Drill a 3/l 6” hole in vertical
cold water line. Attach a saddle
valve to the water line with a
clamp in an easily accessible
location. Insert a washer
between clamp and line. Check
that inlet end is solidly in the drill
hole. Tighten packing nut.
Tighten the pipe clamp screws
evenly so washer makes a
watertight connection. Do Not
over-tighten or copper tubing
could be crushed.
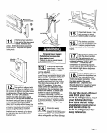
4. Slide compression nut and sleeve
on copper tubing. Insert end of
copper tubing completely into the
outlet valve. Tighten compres-
sion nut to outlet with an adjust-
able wrench. Do Not over-lighten.
Product Damage
Flush at least 2 qts. of water
through the copper tubing and
Into a bucket before attaching to
the refrlgerator to get rld of any
particles in water line. Check for
water leaks around the saddle
valve.
Failure to do so may result In
product damage.
5. Run water through water line,
valve and copper tubing into a
bucket to flush out any particles in
the water line. Turn the saddle
valve to the “OFF” position.
6.
Route copper tubing to the
refrigerator location.
copper tubing I
union
7. Slide compression nut and sleeve
over water line.
8.
Connect union to compression
nut and sleeve and tighten. Do
Not overtighten.
Page 7