Cabinet door
I-
Before you start...
Read the electrical and carpentry
instructions.
Proper installation is your responsibility. A
qualified technician should install this oven.
Make sure you have everything necessary for
correct installation. It is the responsibility of the
installer to comply with the installation
clearances specified on the serial/rating plate.
The serial/rating plate can be found behind the
upper oven door on the frame of the oven.
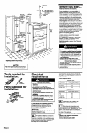
Check location
where the built-in oven will be
installed. The location should be away from
strong draft areas, such as windows, doors, and
strong heating vents. The built-in oven should
be located for convenient use in the kitchen.
Cabinet opening dimensions
that are shown
must be used. Dimensions given are for a built-
in oven sitting on a contact surface 2-314” below
the open oven door height. The contact surface
must be solid and level and flush with the
bottom of the cabinet opening.
The recessed installation area
must provide
complete enclosure around the recessed
portion of the oven.
ALL OPENINGS IN THE WALL OR FLOOR
WHERE THE BUILT-IN OVEN IS TO BE
INSTALLED MUST BE SEALED.
Electrical ground
is required. See “Electrical
requirements.”
‘Note: There must be 1”
min. between bottom of
cablnet door and top of
oven console.
2-112’ min.
-
see Nata l
Oven control
console
Do Not seal
oven to
CabllWS.
I
i
depth
5dn6’ 1
opening
I
height I
support surracc
Note.’
56-7n v-
recessed
oven tmlght
I
7’ mln.
recommended so recommended so
upper oven door, upper oven door,
when open Is 36” when open Is 36”
from floor. from floor.
Electrical Shock Hazard
It is the customer’s responsibility:
l
To contact a qualified electrical installer.
l
To assure that the electrical installation
is adequate and in conformance with
National Electrical Code, ANWNFPA 70
- latest edition**,
and all local codes
and ordinances.
Failure to do so could result in fire,
electrical shock or other personal injury.
Personal Injury Hazard
Securely fasten oven to cabinet using the
8 screws provided.
Failure to do so could cause the oven to
move or tip during use and result in
personal injury.
Important: Observe all governing
codes ordinances.
NOTE:
The oven support surface must be flush
1
with the bottom of the cabinet cutout.
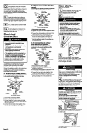
Tools needed for
installation:
Electrical
requirements
recommended. Use the voltage and kilowatt
rating given on serial/rating plate to select the
proper fuse size.
Fuse Requirements
120/208 Volts
Kilowatts
Fuse Size (amps)
6.2
30
Electrical Shock Hazard
l
Electrical ground is required on this
appliance.
l
Do Not ground to a gas pipe.
l
Do Not have a fuse in the neutral or
grounding circuit. A fuse in the neutral or
grounding circuit could result in an
electrical shock.
l
Do Not use an extension cord with this
appliance.
l
Check with a qualified electrician if you
are in doubt as to whether the appliance
is properly grounded.
Failure to follow these instructions could
result
in serious injury or death.
I
6.2 to 8.3
40
Parts supplied for
installation:
I
8.3 to 10.4
50
I
I
120/240 Volts
,,,I
9.6 to 12.0
50
i codes permit and a separate grounding
wire is used, it is recommended that a
qualified electrician determine that the
grounding path is adequate.
IBJ
OVEN MUST BE CONNECTED
n
WITH COPPER WIRE ONLY.
ICI
Wire sizes and connections must
’ conform to the requirements of the
National Electrical Code, ANSI/NFPA 70 - latest
edition**, and all local codes and ordinances.
Wires sizes and connections must conform with
the rating of the appliance.
Copies of the standards listed may be obtained
from:
**National Fire Protection Association
Batterymarch Park
Quincy, Massachusetts 02269
1 IMPORTANT:
I
Save Installation Instructions for the local
electrical inspector’s use.
(Al
This appliance
must
be connected to
. the proper electrical voltage and
frequency as specified on the serial/rating plate
located behind the oven door on the front frame.
A fuse is required in both sides of the line. A
time-delay fuse or circuit breaker is
Panel A