


11
NOTE: Features on your
dishwasher may differ
from model shown.
For top vented models
with a factory-supplied
stainless or painted full
front panel:
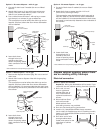
1. Remove the carton containing the factory-supplied full
front panel.
2. Remove the handle package from the front of the
shipping base.
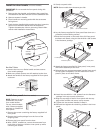
3. Remove the inner panel from the door.
4. With a TORX
®
screwdriver, remove three screws from
both sides of the door. Hold the inner panel up while
removing the screws.
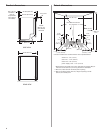
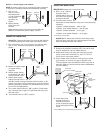
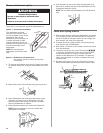
align top edges
2 screws
10. Install the two #8-18 x 1-3/8" screws from the literature
package in the top corners of the door.
11. Align the top edge of the full front panel with the top
edge of the console and secure corner screws.
12. Tighten the two screws installed in Step 9.
13. Reinstall and tighten the remaining screws in the inner
panel.
5. Gently set panel aside.
NOTE: Some models have 4 screws per side.
6. Lay the factory-supplied full front panel face down on a
protective non-scratching surface.
7. Place the inner panel on the back of the full front panel
as shown and attach, using the four #10-16 x 3/8" screws
in the literature package.
8. Attach the factory-supplied full front panel, inner panel,
and handle assembly to the door.
9. Reinstall the two uppermost screws into the inner panel,
do not tighten completely. This will hold the full front
panel in place on the door frame.
top of panel
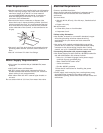
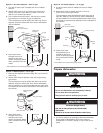
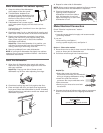
Install the door handle (on some models)
IMPORTANT: Do not scratch the front panel during this
procedure.
1. Remove the door handle and hardware bag containing
the setscrews and Allen wrench from the cardboard box.
2. Start set screws in handle.
3. Place handle on mounting studs with the set screws
facing down.
4. Push the door handle tightly against the door. Insert the
short end of the Allen wrench into the setscrews.
Tighten the setscrews 1/4 turn past snug. Retain Allen
wrench with Installation Instructions.
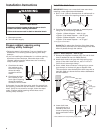
do not remove screw.
screws
4 screws
full front panel
inner door panel
2 screws
screws
inner
door
panel
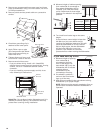
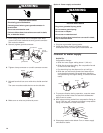
1. Remove the Pro Line
®
Series handle and two screws
from handle package.
2. Make sure plastic spacers are still attached to the door.
3. Attach the handle to the factory-supplied full front panel
as shown.
Pro Line
®
Series
plastic spacers
Install door panel (Pro Line
®
series)
top vent
Allen
wrench
setscrew
(in bottom
of handle)
handle
mounting
stud