


6
In contrast, microwave ovens utilizing this microwave system
deliver the selected power level continuously. This constant
stream of microwave power helps to minimize overcooking of
foods and messy food spatters.
Sensor Cooking
The microwave system features sensor cooking functions. A
humidity sensor in the oven cavity detects moisture and humidity
emitted from food as it heats. The sensor adjusts cooking times
to various types and amounts of food. Sensor cooking takes the
guesswork out of microwave cooking.
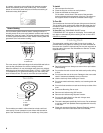
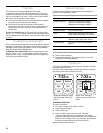
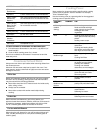
Grill Element
The oven uses a 1,000-watt halogen bulb with a 500-watt bulb to
serve as the grill element for various cooking functions.
When the element is in use, the halogen bulb glows very brightly,
while the glow of the quartz bulb is barely – if at all – visible. (See
“Troubleshooting” for quartz bulb testing.) The oven cavity and
door will become hot. The use of oven mitts is recommended.
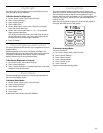
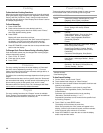
Tu r n t a b l e
The turntable can rotate in either direction to help cook food
more evenly. Do not operate the oven without the turntable in
place. See “Assistance or Service” to reorder any of the parts.
To Install:
1. Remove tape from the hub.
2. Place the support on the oven cavity bottom.
3. Place the turntable on the support.
Fit the raised, curved lines in the center of the turntable
bottom between the three spokes of the hub. The rollers on
the support should fit inside the turntable bottom ridge.
To Turn Off:
The turntable can be turned off (except during an auto function).
This is helpful when cooking with plates that are larger than the
turntable or when cooking with two 10¼ in. (26 cm) plates that
are side by side.
To Tur n Off: Press TURNTABLE ON/OFF button.
“TURNTABLE OFF” will appear in the display. The turntable will
turn back on automatically when cooking is over or when OFF/
CANCEL is pressed.
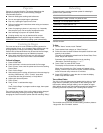
Cooking Rack
The rectangular cooking rack is ideal for two-level cooking. It
provides extra cavity space for cooking 2 or more containers at
the same time. Insert the rack securely into the rack supports on
the side walls of the oven. See “Assistance or Service” to order
replacement parts.
■ Rack will become hot. Always use oven mitts or pot holders
when handling.
■ Do not allow the rack to touch the inside cavity walls, ceiling
or floor.
■ Do not store the rack in the oven. Damage to the oven could
result if someone accidentally turns on the oven.
■ Use the rack only when cooking on 2 levels.
■ Do not use metal cookware, utensils, or a browning dish with
the rack.
■ Do not let food container on rack touch the top or sides of the
oven.
■ Do not use Browning Pan on rack.
■ Remove rack before using Grill function.
■ Remove rack before using Popcorn function.
■ Do not cook food directly on the rack. Always use a
microwave-safe container.
■ The rack is designed specifically for this oven. Do not attempt
to use any other rack (besides those supplied with the oven)
in this oven.
■ Clean rack supports often (see “General Cleaning” section).
Damage to the oven could result due to soil buildup.
1. Halogen bulb
2. Quartz bulb
1. Turntable
2. Hub
3. Support
4. Shaft
1
2
1
2
3
4