


4
INSTALLATION INSTRUCTIONS
Tools and Parts
TOOLS NEEDED:
Gather the required tools and parts before starting installation.
Read and follow the instructions provided with any tools listed
here.
PARTS NEEDED:
Custom Overlay Door Panel—See “Overlay Panel—Rear View.”
Hardware (Optional)
PARTS SUPPLIED:
Custom Overlay Panel
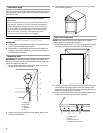
If you plan to install a custom overlay panel, you will need to
create the panel yourself or consult a qualified cabinetmaker or
carpenter. See dimension drawings for panel specifications.
IMPORTANT:
■ The thickness of the wood overlay must be ³⁄₄" (1.91 cm).
■ Overlay panel must not weigh more than 20 lbs (9.07 kg).
■ Overlay panel weighing more than recommended may
cause damage to your refrigerator.
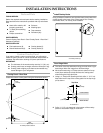
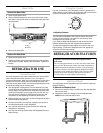
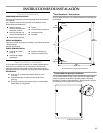
Overlay Panel—Rear View
Create the custom overlay panel using the dimensions shown.
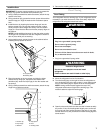
Install Overlay Hooks
Using a Phillips screwdriver and eight flat-head screws attach the
overlay hooks to the back of the overlay panel. See “Overlay
Panel–Rear View,” for overlay hook locations.
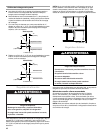
Door Hinge Holes
■ The views of the top and bottom hinge pin hole show a right-
hand hinge. Mirror the image for a left-hand hinge.
■ We recommend using a C-Clamp and two pieces of scrap
wood (front and back) to help reinforce the overlay panel
when drilling the hinge pin holes.
1. Using a ¹⁄₂" Brad point doweling drill bit, drill a ¹⁄₂" (1.27 cm)
deep hole into the top of the overlay panel for the top hinge
pin as shown.
Top View
2. Drill a ¹⁄₂" (1.27 cm) deep hole in the bottom of the overlay
panel for the bottom hinge pin as shown.
■ Hand drill or electric drill
(properly grounded)
■ ¹⁄₂" Brad point doweling
drill bit
■ Phillips screwdriver
■ Scissors
■ Masking tape
■ Tape measure
■ Petroleum jelly
■ Flat-head screws (8)
■ Round-head screws (8)
■ Overlay plates (2)
■ Overlay hooks (4)
A.Overlay hook locations
A
23
³⁄₄
"
(60.33 cm)
1
⁵⁄₁₆
"
(3.33 cm)
1
⁵⁄₁₆
"
(3.33 cm)
4
¹³⁄₃₂
"
(11.2 cm)
2
¹⁄₂
"
(6.4 cm)
29
⁷⁄₈
"
(75.88 cm)
A.Overlay hooks (4)
A.Radius 5.0
A
¹⁄₂"
(1.2 cm)
¹⁷⁄₃₂"
(1.35 mm)
A
Back Surface
Front Surface