


CFNERAL INSTRUCTIONS:
In old houses, it is generally good practice to clean out the existing drain line
from sink to sewer before installing the disposer.
:. The disposer can be installed in steel, monel, stainless steel or cast iron sinks,
with a sink opening of 3-l/2” to 4” without sink alteration.
.: Standard
I -l/2” O.D. or 2” O.D. drain pipe is satisfactory for drain lines. Long
horizontal drain lines should be eliminated. Drum traps and grease traps should
not be used.
PLUSlBING INSTALLATION INSTRUCTIONS:
IO
II
Remove existing sink drain connections and clean drain opening.
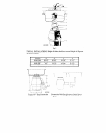
Remove disposer cover. Remove sink flange (1, Fig. I), sink flange seal (2 & 3,
Fig. 1) and pressure washer (4, Fig. 1) by pressing down and pushing snap ring
(6, Fig. 1) clockwise. f lold snap ring and lift sink flange up and out.
Disassemble sink flange, sink flange seal and pressure washer.
Fit the sink flange seal (2, Fig. 1) to sink flange (1, Fig. 1). Insert sink flange
(,I. Fig. 1) into the drain opening. Be sure the sink flange is located in the
center of the drain opening to assure a water-tight seal. NOTE: The rubber sink
flange seal (2, Fig. 1) should always be used where possible. In rare instances
v+here the contour or thickness of the sink opening does not permit use of the
seal, a permanently pliable sealing compound can be
used.
Assemble the other rubber sink flange seal (3, Fig. 1) and pressure washer (4,
Fig. 1) onto the srnk flange by slipping pressure washer over the top set of
depressions and turning so that depressions
lock
pressure washer into place.
Lift disposer up and into sink flange (1, Fig. 1) until
snap
ring clicks into snap
ring groove.
Finger tighten the two adjusting screws (5, Fig. 1) up until they
are in contact with pressure washer (4, Fig. 1). NOTE: The disposer is now
loosely mounted.
Connect disposer to house drainage system and tighten spout bolts.
Tighten the adjusting screws (5, Fig. I) securely to complete mounting.
Install stopper and fill sink with
water.
Remove stopper and check for leaks. If
leakage is discovered, evenly tighten adjusting screws until leakage stops.
Check to assure the grinding chamber is clean of any foreign objects and the
flywheel is free to rotate. Place the cover in position.
Installation must
be
in accordance with local plumbing codes.
DISHWASHER CONNECTION:
Connecting the discharge of a dishwasher to a disposer will assure all waste
particles discharged by the dishwasher are properly sized and flushed to the main
drain system. A dishwasher inlet consisting of a 7/S” dia. tube is provided in the
srde of the upper housing grinding chamber of all KitchenAid Disposers for con-
nection of the dishwasher discharge.
1 Use a long Phillips screwdriver to force out the neoprene drain plug,
2. Remove the drain plug from the grinding chamber.
3. Connect the dishwasher drain hose to the disposer inlet using hose clamps.