


7
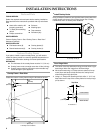
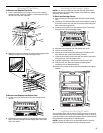
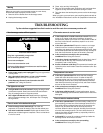
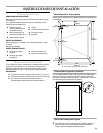
Install the Door
IMPORTANT: To ensure proper operation, be sure to grease the
top hinge, top spacer and washer with petroleum jelly.
1. Using a Phillips screwdriver and three screws, attach the top
spacer to the door.
2. Using petroleum jelly, grease the bottom spacer hole and the
bottom hinge pin. Align the washer with the bottom spacer
hole.
3. Slowly lower the door straight and evenly onto the bottom
hinge pin. Be sure the washer stays in place. Close the door.
Be sure the door properly aligns to the cabinet.
NOTE: Provide additional support for the door when moving
the hinges. Do not depend on the door magnets to hold the
door in place while you are working.
4. Using masking tape, secure the door to the cabinet before
installing the top spacer as shown.
5. Place the washer on the top spacer and align the holes.
Grease the top hinge pin, top spacer and washer with
petroleum jelly. Insert the top hinge pin into the washer and
top spacer.
6. Using a Phillips screwdriver and three screws, attach the top
hinge to the cabinet as shown.
7. Remove the masking tape from the door.
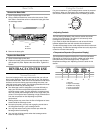
Door Closing
Door Closing
Your beverage center has four leveling legs. If your beverage
center seems unsteady or you want the door to close more easily,
adjust the beverage center’s tilt using the instructions below.
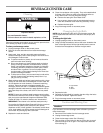
1. Plug into a grounded 3 prong outlet.
2. Move the beverage center into its final location.
3. Turn the leveling legs to the right to lower the beverage center
or turn the leveling legs to the left to raise it. It may take
several turns of the leveling legs to adjust the tilt of the
beverage center.
NOTE: Having someone push against the top of the beverage
center takes some weight off the leveling legs. This makes it
easier to adjust the leveling legs.
4. Open the door and check to make sure that it closes as easily
as you like. If not, tilt the beverage center slightly more to the
rear by turning both front leveling screws to the right. It may
take several more turns, and you should turn both leveling
legs the same amount.
A. Top spacer
B.Masking tape
A. Screws (3)
B. Top Hinge
C.Washer
D.Top spacer
E.Door
F. Overlay frame
A
B
C
D
E
A
B
F
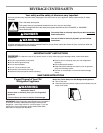
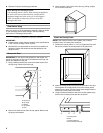
Electrical Shock Hazard
Plug into a grounded 3 prong outlet.
Do not remove ground prong.
Do not use an adapter.
Do not use an extension cord.
Failure to follow these instructions can result in death,
fire, or electrical shock.
WARNING
WARNING
Excessive Weight Hazard
Use two or more people to move and install
beverage center.
Failure to do so can result in back or other injury.