


7
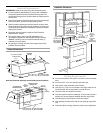
2. Select a flat surface for assembling the hood. Cover that
surface with a protective covering such as a blanket or
cardboard during assembly.
3. Using 2 or more people, slowly lift the range hood onto the
protected surface.
4. Tip range hood on its back to remove the metal filters. Turn
knob to the left (counterclockwise) and lift filters out.
5. Remove hardware package.
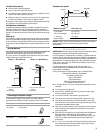
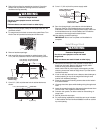
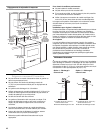
6. Add wood filler strips as needed to cabinet bottom. Drill
4 ³⁄₁₆" (4.8 mm) clearance holes for hood mounting screws.
7. Cut a 6¹⁄₂" (16.5 cm) diameter hole in cabinet bottom as
shown.
8. Cut a 1¹⁄₄" (3.2 cm) hole for power supply cable.
9. Run wire through hole in accordance with the National
Electrical Code or CSA Standards and local codes and
ordinances. There must be enough power supply cable from
the fused disconnect (or circuit breaker) box to make the
connection in the range hood’s electrical box.
10. Use caulking to seal all openings.
IMPORTANT: Do not turn on power until installation is
complete.
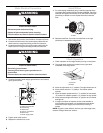
Install Range Hood
1. Remove the terminal box cover (located on back wall of
hood) from the hood. Remove the power supply cable
knockout using a flat-blade screwdriver.
Attach strain relief in power supply cable opening so that
clamping screws are inside of range hood. Tip hood back to
its bottom surface.
2. If roof or wall cap does not have a damper, attach damper to
exhaust opening on top of the range hood using 2 small
screws from hardware package.
3. Place the range hood mounting screws close to the holes in
the cabinet bottom.
4. Lift range hood into place while feeding wiring through strain
relief.
5. Insert the screws through the clearance holes and start them
into the hood. Then, tighten screws securely.
6. Connect vent system, for either vented or recirculating, to
range hood.
7. Seal all joints with duct tape.
8. For recirculating installations, install the vent cover included
in Recirculation Kit Part Number 4396565 in soffit or cabinet
top vent opening.
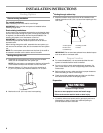
WARNING
Excessive Weight Hazard
Use two or more people to move and install
range hood.
Failure to do so can result in back or other injury.
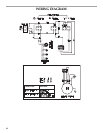
13 ¹⁄₂" (34.3 cm) - 30" (76.2 cm) model
16 ¹⁄₂" (41.9 cm) - 36" (91.4 cm) model
10 ⁹⁄₁₆"
(26.8 cm
)
⁷⁄₈"
(2.2 cm)
³⁄₁₆" (94.8 mm)
clearance holes
wall
wood filler strips
(recessed cabinet
bottoms only)
centerline
6 ¹⁄₂" (16.5 cm) diam. hole
centerline
wall
4" (10.2 cm)
upper cabinet or soffit
mounting surface
power supply
cable hole in wall
centerline
8 ¹⁄₁₆
"
(20.5 cm)
1³⁄₈"
(3.5 cm)
WARNING
Excessive Weight Hazard
Use two or more people to move and install
range hood.
Failure to do so can result in back or other injury.