


5
Complete the Installation
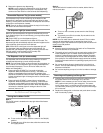
1. Plug into a grounded 3 prong outlet.
2. Flush the water system. See “Prepare the Water System” or
“Water and Ice Dispensers.”
NOTE: It may take up to 24 hours for your ice maker to begin
producing ice.
REFRIGERATOR USE
Using the Controls
For your convenience, your refrigerator controls are preset at the
factory. When you first install your refrigerator, make sure that the
controls are still preset. The Refrigerator Control and the Freezer
Control should both be set to the “mid-settings.”
IMPORTANT:
■ Your product will not cool when the Refrigerator Control is set
to OFF.
■ The Refrigerator Control adjusts the refrigerator compartment
temperature. The Freezer Control adjusts the freezer
compartment temperature.
■ Wait 24 hours before you put food into the refrigerator. If you
add food before the refrigerator has cooled completely, your
food may spoil.
NOTE: Adjusting the Refrigerator and Freezer Controls to a
higher (colder) than recommended setting will not cool the
compartments any faster.
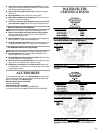
Digital Controls
NOTE: The factory recommended set points are 0°F (-18°C) for
the freezer and 37°F (3°C) for the refrigerator.
To turn refrigerator on and view set points:
■ Press and hold POWER (ON/OFF) pad for 2 seconds.
To view the Celsius temperatures:
■ Press the °C SELECT pad. The indicator will light up. To
redisplay degrees in Fahrenheit, press the °C SELECT pad
again.
NOTE: If the freezer temperature is below zero, the negative sign
next to the freezer display will light up.
Adjusting Controls
The settings indicated in the previous section should be correct
for normal household refrigerator usage. The controls are set
correctly when milk or juice is as cold as you like and when ice
cream is firm.
If you need to adjust temperatures in the refrigerator or freezer,
press the refrigerator or freezer PLUS (+) or MINUS (-) pad until
the desired temperature is reached. Use the settings listed in the
chart below as a guide. Wait at least 24 hours between
adjustments.
Additional Control Panel Features
Additional features are located on the control panel at the top of
the refrigerator compartment.
Max Cool
The Max Cool feature assists with periods of heavy ice usage, full
grocery loads, or temporarily warm room temperatures.
■ Press MAX COOL pad to turn on the Max Cool feature. The
Max Cool indicator light will remain on for 24 hours unless
manually turned off.
NOTE: The temperature display will not change. After
24 hours, the refrigerator returns to the previous temperature
set points.
Accelerated Ice Production (on some models)
This feature assists with temporary periods of heavy ice use by
increasing ice production over a 24-hour period.
■ Press OPTIMICE
®
feature touch pad to turn on the OptimIce
®
feature. The OptimIce
®
setting will remain on for 24 hours
unless manually turned off.
■ If increased ice production is desired at all times, set the
Freezer Control to a colder number. Setting the freezer to a
colder temperature may make some foods, such as ice cream,
harder.
Temperature System
The Temperature System feature lets you know the compressor or
evaporator fan is running. It is normal for this indicator light to be
on.
Electrical Shock Hazard
Plug into a grounded 3 prong outlet.
Do not remove ground prong.
Do not use an adapter.
Do not use an extension cord.
Failure to follow these instructions can result in death,
fire, or electrical shock.
WARNING
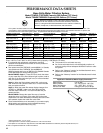
CONDITION/REASON: TEMPERATURE
ADJUSTMENT:
REFRIGERATOR too cold
Not set correctly for conditions
REFRIGERATOR
Control 1° higher
REFRIGERATOR too warm
High use or room very warm
REFRIGERATOR
Control 1° lower
FREEZER too cold
Not set correctly for conditions
FREEZER Control
1° higher
FREEZER too warm/too little ice
High use or heavy ice use
FREEZER Control
1° lower