


6
REFRIGERATOR USE
Normal Sounds
Your new refrigerator may make sounds that your old one didn’t
make. Because the sounds are new to you, you might be
concerned about them. Most of the new sounds are normal. Hard
surfaces, such as the flooring and surrounding structures, can
make the sounds seem louder. The following describes the kinds
of sounds and what may be making them.
■ Your refrigerator is designed to run more efficiently to keep
your food items at the desired temperatures and to minimize
energy usage. The high efficiency compressor and fans may
cause your refrigerator to run longer than your old one. You
may also hear a pulsating or high-pitched sound from the
compressor or fans adjusting to optimize performance.
■ Rattling noises may come from the flow of refrigerant or items
stored inside the refrigerator.
■ As each cycle ends, you may hear a gurgling sound due to
the refrigerant flowing in your refrigerator.
■ You may hear water running into the drain pan when the
refrigerator is defrosting.
■ You may hear clicking sounds when the refrigerator starts or
stops running.
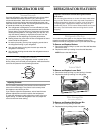
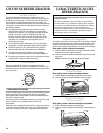
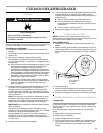
Using the Control
For your convenience, your refrigerator control is preset at the
factory. When you first install your refrigerator, make sure that the
control is still preset to the mid-setting as shown.
Adjusting Controls
The mid-setting indicated in the previous section should be
correct for normal usage. The control is set correctly when
beverages are as cold as you like.
If you need to adjust the temperature, wait at least 24 hours
between adjustments and then recheck the temperature.
To make the refrigerator colder, adjust the control to the next
higher setting. To make the refrigerator less cold, adjust the
control to the next lower setting.
REFRIGERATOR FEATURES
Refrigerator Shelves
Your model may have glass or wire shelves. Store similar foods
together and adjust the shelves to fit different heights. This
reduces the time the refrigerator door is open and saves energy.
To Remove and Replace Shelves:
1. Remove the shelf by lifting it up and out of the shelf brackets.
Remove the shelf.
2. Replace the shelf by inserting it into the shelf brackets.
NOTE: Be sure the shelf is level.
Lower Shelf
To Remove and Replace Lower Shelf:
1. Remove the shelf by lifting it up and pulling it forward.
2. Replace the shelf by lowering it on the guides.
Wire Storage Bin
(on some models)
To Remove and Replace Wire Storage Bin:
1. Remove the bin by pulling it forward.
2. Replace the bin by sliding it back into place.
Important information to know about glass shelves
and covers:
Do not clean glass shelves or covers with warm water when
they are cold. Shelves and covers may break if exposed to
sudden temperature changes or impact, such as bumping.
Tempered glass is designed to shatter into many small,
pebble-size pieces. This is normal. Glass shelves and covers
are heavy. Use both hands when removing them to avoid
dropping.