


7
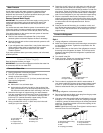
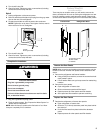
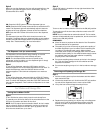
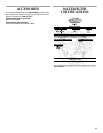
Dimensions for Routing Handle Sides of Door Panels
(End View)
Rout entire areas of handle side of panels 3¹⁄₄" (8.25 cm).
REFRIGERATOR USE
Using the Controls
For your convenience, your refrigerator controls are preset at the
factory. When you first install your refrigerator, make sure that the
controls are still preset. The Refrigerator Control and the Freezer
Control should both be set to the “mid-settings.”
Your model may have Slide Controls, Electronic Controls or
Digital Controls.
IMPORTANT (All Controls):
■ The Refrigerator Control adjusts the refrigerator compartment
temperature. The Freezer Control adjusts the freezer
compartment temperature.
■ Wait 24 hours before you put food into the refrigerator. If you
add food before the refrigerator has cooled completely, your
food may spoil.
NOTE: Adjusting the Refrigerator and Freezer Controls to a
higher (colder) than recommended setting will not cool the
compartments any faster.
■ If the temperature is too warm or too cold in the refrigerator or
freezer, first check the air vents to be sure they are not
blocked before adjusting the controls.
■ The preset settings should be correct for normal household
usage. The controls are set correctly when milk or juice is as
cold as you like and when ice cream is firm.
■ Wait at least 24 hours between adjustments. Recheck the
temperatures before other adjustments are made.
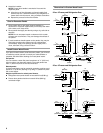
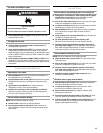
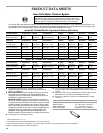
Slide Controls (on some models)
Style 1
Style 2
IMPORTANT:
■ For Style 1, your product will not cool when the Refrigerator
control is set to OFF. For Style 2, your product will not cool
when the Freezer Control is set to OFF.
■ The Automatic Exterior Moisture control continuously guards
against moisture buildup on the outside of your refrigerator
cabinet. This control does not have to be set or adjusted.
Adjusting Slide Controls
Settings to the left of the mid-setting make the temperature less
cold. Settings to the right of the mid-setting make the
temperature colder.
■ Slide the FREEZER or REFRIGERATOR control one setting to
the right or left depending on the needed temperature
change.
NOTE: For Style 1, after adjusting the refrigerator
temperature, wait 24 hours and then recheck the FREEZER
temperature before making additional adjustments.
Electronic Controls (on some models)
To turn the refrigerator on, press and hold ON/OFF for 2 seconds.
The indicator lights show the current temperature control
settings.
Adjusting Electronic Controls
Settings to the left of the mid-setting make the temperature less
cold. Settings to the right of the mid-setting make the
temperature colder.
■ Press the FREEZER or REFRIGERATOR arrow to move the
indicator light to the right, one setting at a time. Continue
moving the indicator light until it is at the desired setting.
NOTE: With each press of the arrow, you will hear a beep as
the light moves to the next setting. The indicator light moves
to a setting of “7” and then returns to the setting of “1.”
2" (5 cm)
min.
¹⁄₄
" (6.35 mm) max.
3
¹⁄₄
"
(8.25 cm)
min.
Door
Panel
Handle
1"
(2.54 cm)
Door
Panel
Hinge Side
Refrigerator
off
colder
1
234
Freezer
cold
colder
1
234
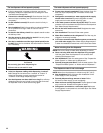
Colder
Freezer
Off
1
2
3
4
Cold
Colder
Refrigerator
1
2
3
4
CONDITION: SETTING ADJUSTMENT:
REFRIGERATOR too cold REFRIGERATOR Control
one setting lower
REFRIGERATOR too warm REFRIGERATOR Control
one setting higher
FREEZER too cold FREEZER Control
one setting lower
FREEZER too warm/too little ice FREEZER Control
one setting higher