


Wiring the U.K. and European TP Terminal Blocks
The European wall plates are equipped with an easy plug-in terminal block to attach the
twisted pair cables. Follow the colors of the color-coded sticker on these terminals for
proper connection of the twisted pair cable.
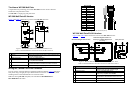
Figure 4 defines the pinouts for the TP terminal block.
Figure 4: WP-306 Wall Plate EU/UK TP Terminal Block Pinouts
Notes:
• Use the connector clips when removing the wires, not when inserting them
• Each wire protrudes 9mm in length from the plastic insulation so that it can be easily connected. To
prevent the wires crossing, be sure that each wire is completely inserted
• The cable ground shielding must be connected / soldered to the connector shield
Grounding the Wall Plate
Use the grounding screw to earth the chassis of the unit to the ground of the building. This
prevents static electricity from interfering with the product’s performance.
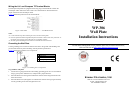
Figure 5 defines the grounding screw components.
# Item
1 M3X6 screw
2 1/8" Toothed Lock Washer
3 M3 Ring Tongue Terminal
Figure 5: Grounding Screw Components
To ground the wall plate:
1. Connect the ring tongue terminal to the building grounding point wire. We recommend
using a green-yellow AWG#18 wire, crimped with a proper hand-tool.
2. Insert the M3x6 screw through the toothed lock washers and the tongue terminal in the
order shown above.
3. Insert the M3x6 screw (through the two toothed lock washers and ring tongue terminal)
into the grounding screw hole and tighten the screw.
WP-306
Wall Plate
Installation Instructions
For the latest information on our products and a list of Kramer distributors,
visit our Web site at
Uhttp://www.kramerelectronics.comU
PN:
2900-000772
Rev:
3
Kramer Electronics, Ltd.
Web site: www.kramerelectronics.com
E-mail: info@kramerel.com
P/N: 2900-000772 REV 3