


15
Gea-Top/001
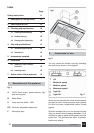
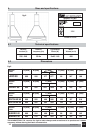
5. Accessories supplied
1 120/150 mm reduction
2 wall support for tubecover
2 wall plugs (Ø9x40)
2 long bolts (Ø9x40)
6 wall plugs (Ø5x40)
6 long bolts (Ø5x40)
2 active carbon filters (optional)
6. Installation
On installing the kitchen hood make sure thet
Safety Instructions set out on page 14 are
complied with.
To obtain optimum performance, the external duct
must not to be more than FOUR METERS LONG,
have no more than two 90° angles and its
diameter must be at least Ø120.
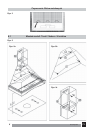
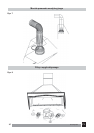
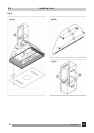
6.1 Installing: Trenti / Nubero / Ventoline
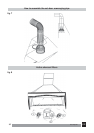
fig.5
1. Mount the 150/120 reduction whenever the
air discharge tube is Ø125 (fig.7);
2. Trace and drill the points for fitting the wall
plugs (H Ø9x40) and (L Ø5x30) onto the wall
at the desired height by leaning the hood on
the wall, then tighten the long bolts (H);
3. Hang the kitchen hood, hooking its support
(I)
onto the long bolts (H) as in fig.5b and then
tighten the long bolts (L);
4. Trace and drill the location of the lower support
(G) of the tubecover, fit the wall plugs (M) and
fix it by using the bolts (M), then hook the
fixed chimney to its support (G) as in fig.5c;
5. Mount the mobile chimney and lift it up to the
desired height and mark its shape on the wall;
6. Remove the fixed and mobile chimneys;
7. Centre the upper support (G) around the
shape marked, trace and drill the fixing points
for fitting wall plugs (M), then fix the support
(G) by using bolts (M);
8. Attach the inner tube, possibly flexible, with a
clamp (not supplied) to the motor’s air outlet
or to the 150/120 reduction as the case may
be (fig.7);
9. Once the inner tube is fitted, fit the fixed and
mobile chimney around the extractor fan outlet
and hook them onto respective supports;
10.Connect the scavenging pipe to the outdoor
duct and fix it with a pipe tightening clamp.
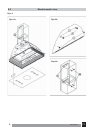
6.2 Installing: Laro
fig.6
1. Mount the 150/120 reduction whenever the
air discharge tube is Ø125 (fig.7);
2. Trace and drill the points for fitting the wall
plugs (H Ø9x40) and (L Ø5x30) onto the wall
at the desired height by leaning the hood on
the wall, then tighten the long bolts (H);
3. Hang the kitchen hood, hooking holes (I) onto
the long bolts (H) as in fig.6b and then tighten
the long bolts (L);
4. Trace and drill the location of the lower support
(G) of the tubecover, fit the wall plugs (M) and
fix it by using the bolts (M), then hook the
fixed chimney to its support (G) as in fig.6c;
5. Mount the mobile chimney and lift it up to the
desired height and mark its shape on the wall;
UK