


18
C 16/CI 16
A delight in freshness
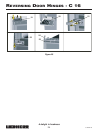
REVERSING DOOR HINGES - CI 16
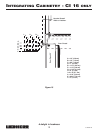
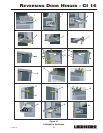
13. Mount the right installation frame (10) on the
other side. Discard the two other frames (11).
14. Mount the two enclosed frames (12) on the
right side. Do not forget the angle bracket
corner (13).
15. Lock the angle bracket (13) with the installation
frame.
16. Remove the door mounting from the refrigerator
and attach it on the other side (14).
17. Remove hinge sockets (15).
18. Remove door change frames (16).
19. Pull out shrouded-type panel (17) at the door
change frame at the handle side.
20. Remove screws (19).
21. Remove handle (18).
22. Remove the other door change frames (20) and
mount them on the opposite side.
23. Insert handle brackets (21) again into the slots
and attach handle.
24. Push shrouded-type panel (22) in the door
change frames.
25. Mount door change frames above and down
(23).
26. Insert hinge socket (24) into the frames.
27. Attach hinge socket (25) with screws to the
door.
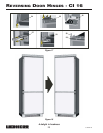
28. Follow these instructions to change the other
door.
29. Insert spacers (26) for the upper door.
30. Attach center door fixture (27).
31. Place down lower door again on the lower door
mounting bracket.
32. Insert the metal pin (28) into the sleeve.
33. Position other door on the door mounting
center. Use other spacer (29) and attach door
with hinge bolt (30).
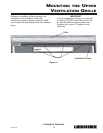
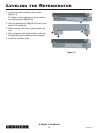
34. Mount the upper ventilation grille (Figure 11).
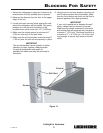
IMPORTANT
If the hinges and door handles are reversed,
you must obtain the Reverse Set. The
Reverse Set is not included with the unit.
Changing the door stop must be made by
two people to prevent personal injury and
damage to the doors.
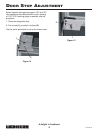
1. Remove the upper ventilation grille if already
installed.
2. Remove the screw (1) at the door fixture.
Secure door to prevent personal injury
and to prevent the door from falling down.
3. Remove spacers (2).
The door can now be lifted and placed on the
floor.
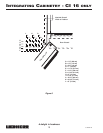
4. Pull out the bearing pin (3) at the door fixture
center.
Secure door to prevent personal injury
and to prevent the door from falling down.
5. Lift the door and place it on the floor.
6. Remove the door fixture (4).
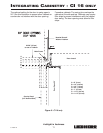
7. Loosen the screws at the door fixture.
8. Remove the screw (5) at the lower door fixture
and turn it into the other bore.
The door fixture down can be mounted again
on the other side (6).
9. Pull out plastic sleeve and assemble on the
opposite side of the bracket (7).
10. Remove both screws (8) at the back of the
installation frame.
11. Remove the 18 mounting screws (9) to
dismantle the installation frame.
12. Mount the installation frame.
CAUTION
!
CAUTION
!
CAUTION
!