


9
OPERATING INSTRUCTIONS
Frying
1. Switch on the fryer; the red indicator light will turn on.
2. Set the thermostat to the desired temperature setting.
3. Within 10 to 15 minutes, the oil or fat will be heated to the selected temperature and
the indicator light will turn off.
4. While the fryer is heating, the indicator light will turn on and off several times. The
indicator light remains lit as long as the heating element is heating. If the light does not
switch on and stays off, the oil or fat has reached the set temperature.
5. Before frying the next basket, make sure the fryer temperature is stable. This is
indicated by the light remaining off.
6. When using oil or liquid fat, the basket can remain in the fryer while heating. The basket
can also be left in the fryer if the fat around the basket is solidified.
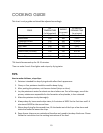
7. Do not exceed the maximum filling quantities specified in these instructions (see Table).
8. Carefully replace the basket in the fryer and place the lid on the pot.
9. While frying, occasionally remove the basket from the oil or fat and carefully shake the
contents.
10. Once the food has been deep fried to the recommended and/or desired levels, remove
the lid, lift the basket, and rest the basket on the edge of the pot (using the basket rest
at the base of the handle) to allow the oil to drip off.
11. Carefully lift the basket out of the pot. If necessary, gently shake off the excess oil or fat
over the fryer.
12. Place the fried food in a bowl or sieve (lined with absorbent kitchen paper).
After Frying
1. Switch off the fryer, set the thermostat to the lowest temperature by turning the
control knob counterclockwise and unplug the unit. Allow the oil or fat to cool.
CAUTION: Oil or fat must be cooled to room temperature before removal and disposal
2. To empty the fryer, remove the lid and basket. Remove the oil pot from the fryer and
pour out the oil or remove the fat for storage or disposal (see Care and Maintenance).
NOTE: If the fryer contains solid fat, allow the fat to solidify in the fryer before removal
(see Care and Maintenance).
3. Thoroughly clean parts, let dry, reassemble and store in a cool, dark area (see Care and
Maintenance).