


5. When installing in limited access areas, the insulation can be cut to allow installation of the bulkhead insulation in two pieces.
Peel the white backing off of the insulation for the back bulkhead (9” x 30”). Align the slots in the insulation with the ridges in
the base. Press the insulation against the bulkhead to secure. The insulation will overlap the left and right side insulation
installed earlier. Ensure that the foam and fiberglass insulation mates flush with no voids.
6. Peel the white backing off of the 3” x 30” strip of insulation and install over the bottom section of the 9” x 30” insulation
installed in step 6. Align cut slots with the back bulkhead insulation and press to seal.
7. Use black silicone sealant to seal: insulation to the base, foam insulation to foam insulation joints, any voids where insulation
meets or overlaps. Add bulkhead corner insulation covers where the rear bulkhead and side panel corners meet.
8. Verify no moisture is present in the suction line tubing. If moisture is present, drain and dry the insulation and reinstall
following step 10 instructions.
9. Install armaflex insulation over the existing insulation on suction line. Use 3/4” x 3/8” insulation on the evaporator outlet and
inlet tubing and 2” x 3/8” on the rest of the suction line. Use suitable glue to seal insulation airtight (do not use electrical tape).
Seal the ends of the insulation with wire ties.
10. Remove clear vinyl tube from dump valve and brass wing adapter. Install armaflex insulation over tube and then reinstall tube
to dump valve and adapter. Ensure white clamps are secure to prevent water from leaking.
8005493
Sheet 3 of 3
06/02/00
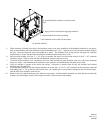
7. Seal insulation to base with silicone sealant
5. Align insulation slits with base ribbing
10. Insulate drain line
4. Apply bead of silicone before applying insulation
9. Install additional insulation on entire suction
line