


CARE AND CLEANING OF YOUR WINE CELLAR
Insert Wine Bottles
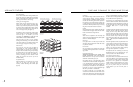
The six roll-out shelves each hold eight bottles. See
figure 4 for typical wine bottle spacing. Tall bottles
should not be loaded on the bottom rack because
they may prevent the door from closing.
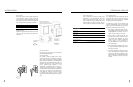
Loading Tips and Suggestions
Bottom rack(s) may be removed for storing “jug”
wines. You may store magnums and other large
bottles on any of the racks (except for the top rack)
by removing the rack directly above them. Position
white wines on the middle or lower racks and red
wines on the upper racks. (See figure 5)
The bottles on the top rack directly under the light
will be exposed to a slightly higher temperature
when the light is on. Position your wines
accordingly and REMEMBER TO TURN OFF THE
LIGHT WHEN IT IS NO LONGER NEEDED.
Keep wines that you plan to use for everyday
drinking and entertaining on the front half of the
racks where labels are completely visible. Place
wines for aging or longer term storing in rear.
Roll-out Racks
The six-roll out wine racks may be pulled out
approximately 14 inches to facilitate adding or
removing bottles. Do not lean on or press down
heavily on the wine shelves. Doing so may damage
the shelves and the wine bottles stored on them.
Pull the wine racks out gently and carefully to
minimize unsettling your wine collection. Avoid
pulling out more than one rack at any time to
maintain stability.
Single Bottle Racks
Because bottles are not stacked on top of each
other, you can easily view and access your
inventory without disturbing other bottles. (See
figure 6)
APPLIANCE FEATURES
6
5
Front Bottles (Necks Facing Rear)
Rear Bottles (Necks Facing Front)
figure 4
figure 5
figure 6
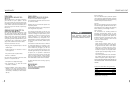
Condenser
The condenser tubing inside the cabinet does not
require frequent cleaning; however, satisfactory
cooling depends on adequate ventilation over the
coils. Be sure that nothing obstructs the required air
flow openings in front of the cabinet. At least once
or twice a year brush or vacuum lint and dirt from the
condenser for efficient performance by unscrewing
the grille on the bottom front of the cabinet.
Cabinet
The painted cabinet can be washed with mild soap
and water and thoroughly rinsed with clear water.
Never use abrasive scouring cleaners.
Interior
Wash interior compartment with mild soap and
water. Do not use an abrasive cleaner, solvent, polish
cleaner or undiluted detergent.
Glass Door
Use a glass cleaner or mild soap and water and
soft cloth to clean the glass door model. Do not use
any abrasive cleaners.
Door Gasket
The vinyl gasket may be cleaned with mild soap
and water, a baking soda solution or a mild scour-
ing powder.
Light Tube Replacement
WARNING! DISCONNECT THE POWER CORD
BEFORE ATTEMPTING LIGHT TUBE REPLACE-
MENT. Failure to do so may result in an electrical
shock that could severely injure you.
This product uses two, 6 watt light tubes to illumi-
nate the interior of the wine cellar. The light tube is
a very reliable electrical component, but should it
not function properly, please call the dealer you
purchased your wine cellar from for a replacement
light tube. Use only an original equipment light
tube from your dealer or manufacturer.
To replace a light tube, use a hex-head driver,
remove the two hex-head screws that hold a cover
plate over the back section of the light tube. Set the
screws and cover plate aside for re-assembly later.
Using a small flat-blade screwdriver, gently lever
the front section of the light tube down to allow it
to be pulled clear of the light housing.
Disconnect the two insulated electrical connectors
from the cabinet’s electrical cable and discard the
old light tube. Reconnect the electrical connector of
the new light tube to the cabinet’s electrical cable
connectors. Make sure it is secure and fully
installed.
Carefully realign the light tube’s electrical terminal
back into the rear of the light enclosure channel
making sure not to crimp them. Gently insert the
light tube along the length of the light enclosure
channel. Press the light tube gently into the light
enclosure channel. Only a small part of the light
tube should project below the ceiling of the wine
cellar. DO NOT USE A HAMMER TO FIT THE
LIGHT TUBE.
Place the light tube terminal cover plate back in the
original position on the light enclosure’s flange. Re-
use the original two screws to secure it in place.
Plug the wine cellar into the electrical socket.
Check to see if the light tubes operate properly.
Your light tube’s replacement is complete.
The light tubes are not covered by your warranty.
Replacement tubes can be obtained from your
service provider or from Marvel Industries.
In the Event of a Power Failure
Most power failures are corrected within two hours
and will not affect the unit’s temperature providing
you minimize the number of door openings while
the power is off. A gradual rise in temperature
should not have any adverse effect on your wine if
power is out for a longer period. If it is extremely
hot, you may want to move your wines to the
coolest location you can find until power is
restored.