


FULL OVERLAY PANEL INSTALLATION INSTRUCTIONS
4
Step 1: Determine Wood Screw Requirements
A #8 pan head wood screw should be used to properly 1.
secure the overlay panel. A total of 8 screws will be
needed.
Use only pan head screws.2.
Do not select a screw that is longer thant he wood 3.
thickness at the screw locations.
Use recommeded pilot holes for the frame material 4.
(see Table A below).
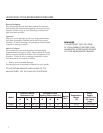
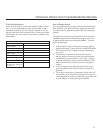
Table A: Pilot Hole Drill Sizes for Wood Screws
Material Type Wood Screw Size
Work Material 8
Hardwood 3/32
Softwood 5/64
Step 2: Remove Drawer Fronts
(Note: The overlay panel may be installed without remov-
ing the drawer fronts from the drawer bodies, but the full
drawer assembly is not as easy to handle as the drawer
front alone.)
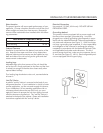
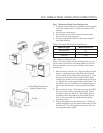
Remove drawer from the unit. Begin by pulling out the 1.
drawer. Locate the drawer lock which can be found
on the outside of the cabinet slide (see Figure 3). Push
the back of the drawer lock forward and then down,
releasing the drawer from the cabinet slide (see Figure
4). Repeat this on the opposite side of the drawer. Lift
the drawer up from the slides at a 90 degree angle to
fully extricate the drawer from the cabinet (see Figure
5).
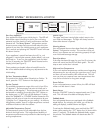
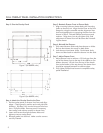
Remove drawer fronts. Do this by removing the 8 Phil-2.
lips screws and washers securing the drawer front to
the drawer body (see Figure 6). Mark lightly with an
erasable marker the position of the stainless drawer
liner as it is secured to the stainless drawer before
removing screws.
Remove the gasket from the drawer front. Do this by 3.
pulling the gasket out of the channel that holds it to the
drawer front. This will expose the clearance holes for
mounting the overlay panel.
Gasket
5/16 Phillips Head Screws
Holding Drawer Front
Figure 4
Figure 5
Figure 3
Figure 6