


ABOUT YOUR RANGE
12
S Be sure all packing material is removed from oven
before turning on.
S Do not use oven for storing food or cookware.
S Many aerosol-type spray cans are EXPLOSIVE
when exposed to heat and may be highly flammable.
Avoid their use or s torage near the oven.
S Allow steam and hot air to escape before reaching
into oven to check, add, or remove food.
S Prepared Food Warning: Follow food m anufacturer’s
instructions. If a plastic frozen food container and/or
its cover distorts, warps, or is otherwise damaged
during cooking, immediately discard the food and its
container. The food could be contaminated.
S Follow the manufacturer’s directions when using
oven cooking bags .
CAUTION
OVEN DOOR
S WARNING: NEVER place excessive weight on or
stand on an open oven door . This could cause the
range to tip over, break the door, or injure the user.
S NEVER place fingers between hinge and front oven
frame. Hinge arms are spring mounted. If
accidently hit, the hinge will slam shut against oven
frame and could injure your fingers.
CAUTION
When baking, be sure ov en door is completely closed.
Baking results will be affected if door is not closed.
The oven door is not designed to be removed by the
consumer.
When opening the oven door, allow steam and hot air to
escape before reaching in ov en to c heck, add or remove
food.
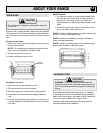
OVEN BOTTOM
To remove: When cool, loosen the two screws located
along the front of the oven bottom. Slide the screws back
to release the front of the oven bottom. Grasp ov en
bottom, lift up and pull forward until rear tabs release.
Then, remove ov en bottom from oven.
To replace: Insert the tabs into the slots on the back oven
wall. Lower into place. Slide two screws forward and
tighten. Be sure bottom is fitted into slots and screws are
tight. If not correctly replaced, oven bottom may become
warped and cooking results will be affected.
BROILER DRAWER
To remove: When broiler is cool, remove broiler insert
and pan. Open drawer halfway and pull metal clip located
in center of drawer bottom upward as far as it will go
(about 2 inches). The drawer can now be pulled all the
way out of the compartment.
To replace: S lide grooves at top of drawer onto guide
rails at sides of broiler compartment and push drawer in to
close.