


8
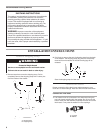
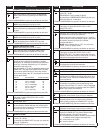
Level the washer
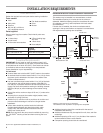
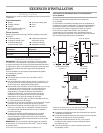
1. Tilt washer forward, raising rear legs 25 mm (1") off of oor.
To adjust rear self-leveling legs, gently lower washer to oor.
2. Check levelness of the washer by
placing a carpenter’s level on top
of the washer, rst side to side;
then front to back.
3. If washer is not level, adjust the front legs up or down. Make
nal check with level.
4. When washer is level, use a wrench
to turn the nuts on front legs up tightly
against washer base. If nuts are not tight
against washer base, the washer may
vibrate.
Complete Installation
1. Check the electrical requirements. Be sure that you have
the correct electrical supply and the recommended earthing
method.
2. Check that all parts are now installed. If there is an extra part,
go back through the steps to see which step was skipped.
3. Turn on water taps and check for leaks. Tighten couplings if
there is leaking. Do not overtighten; this could cause damage
to the taps.
4. Be sure you have all of your tools.
5. Check that the shipping strap was removed from the back
of the washer and used to secure the drain hose. If entire
strap is not removed, washer may vibrate and be noisy.
6. Plug power supply cord into an earthed outlet.
NOTE: On some models, during factory testing, the timer is
advanced partially into the cycle, causing the start button to be
depressed. Allow timer to advance to the end of the cycle. When
the cycle is complete, the timer will reset and the start button will
return to the start position. If the timer is not allowed to advance
to the end of the rst cycle and reset, the wash load will not be
completed.
Checklist for washer operation
Check the following if the washer is not operating properly:
1. Power supply cord is plugged in.
2. Circuit breaker is not tripped or fuse is not blown.
3. Timer has been advanced to start of a cycle.
4. Water taps are turned on.
5. Inlet and drain hoses are not kinked.
6. Washer lid is closed.
7. Inlet valve can freeze if not protected from the weather.
8. Suds level. Excess suds will slow the spin and cause poor
rinsing. Operate the washer through a complete cycle with
no detergent. Use less detergent or a controlled suds type
detergent in future loads.
If you need assistance:
Contact your authorized Maytag
®
Commercial Laundry
distributor. To locate your authorized Maytag
®
Commercial
Laundry distributor, or for web inquiries, visit
www.MaytagCommercialLaundry.com.
When you call, you will need the washer model number and
serial number. Both numbers can be found on the model/
serial-rating plate located under the lid.
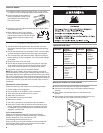
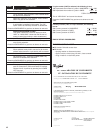
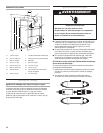
Moving the washer to a new location
n Remove the front legs from the base of the washer.
n Place both rear leveling legs in the upper position and tape
securely.
n Apply tape to the side and bottom of the cabinet near
the rear.
n Open washer lid and wedge a blanket between the tub ring
and the cabinet top to restrict the tub movement.
Load Type Loading
Suggestion
Load Type Loading
Suggestion
Mixed Load 3 double sheets
4 pillowcases
6 pair shorts
8 T-shirts
2 shirts
2 blouses
8 handkerchiefs
Heavy Work
Clothes
3 pair pants
3 shirts
1 coverall
4 pair jeans
1 overall
Permanent
Press
2 double or
1 king-size sheet
1 tablecloth
1 dress
1 blouse
2 slacks
3 shirts
2 pillowcases
Knits 3 blouses
4 slacks
6 shirts
4 tops
4 dresses
Typical full load sizes
Rear legs
Tape 2 sides.
Front legs
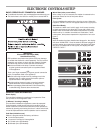
Operating Tips