


14
15
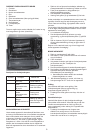
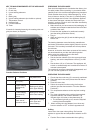
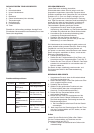
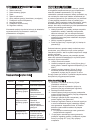
KEY TO MAIN COMPONENTS OF THE APPLIANCE
1. Oven door
2. Crumb tray
3. Lower heating elements
4. Grid
5. Baking tray
6. Upper heating elements (not visible on picture)
7. Temperature control
8. Indicator light
9. Function selector
10. Timer
A handle for inserting/removing the roasting dish and
grid (not shown) is supplied.
Function Selector Positions
PREPARING THE APPLIANCE
Each individual appliance is checked at the factory, but
for safety’s sake, after unpacking it, you should check
carefully that it has not been damaged during transport.
Check whether there is any visible damage (e.g. in the
form of dents or similar), if the door (1) closes properly,
and if the hinges are in order. If the appliance appears
to have been damaged, contact the shop where you
bought it, and do not use it until it has been checked by
an authorised specialist.
• Make sure that you have removed all packaging, all
stickers and transport materials from the inside and
outside of the oven.
• Ensure that the appliance is positioned correctly
(see the safety precautions above).
• Plug in.
• Wash and wipe the grill (4) and the baking tray (5)
before use.
The heating elements were oiled during manufacture
and these will therefore smoke slightly when the oven is
rstused.Thisisentirelyharmlessandwillstopaftera
few minutes.
However, so that the food does not taste of this smoke,
we recommend that you take the following action
beforeusingtheapplianceforthersttime:
• Leave the oven door ajar.
• Set the function selector (9) to the upper and lower
heating, and set the temperature control (7) to 250
°C.
• Set the timer (10) to 15 minutes. The appliance will
switch on automatically and is switched off when 15
minutes have elapsed.
The smoke will now have completely disappeared, and
you can use the appliance to cook food.
OPERATING THE APPLIANCE
1. Check that the crumb tray (2) is correctly positioned.
2. Place the food in the oven (unless the oven has to
preheat).
3. Close the oven door.
4. Select the required function using the function
selector (see the above section “Function Selector
Positions”).
5. Turn temperature selector to the required cooking
time.
6. Turn timer clockwise to the cooking time required.
Apparatet tændes, når timeren aktiveres. The
indicator light will come on simultaneously (8).
o The indicator light will go off, once the required
cooking time has elapsed.
7. When cooking time has elapsed, turn timer and
function selector to OFF to switch apparatus off.
Grilling
Leave oven door open when grilling. Set function
selector to upper hear and temperature selector to 250
°C.
o Caution! Do not leave unattended when grilling.
Symboli Toiminto Käyttötarkoitus
OFF (OFF)
Upper heating
elements (6)
active
Lower heating
elements (3)
active
Both sets of
elements active
Oven switched off
Baking and grilling
with upper heating
Baking and roasting
with lower heating
Baking and roasting
with upper and
lower heating