


Setting the Clock
1. Plug into 120 V~60 Hz outlet.
2. The display will go to AM 12:00 and continue to flash until you
press a button.
3. Press the Program button, “SET TIME” will be displayed in the
top right corner.
4. Press and hold the HR button for rapid hour advancement.
When the desired hour is reached, release the button.
5. Press and hold the MIN button for rapid minute advancement.
When the desired minute is reached, release the button.
6. Press the PROG button again. The time is now set. If you do
not press the PROG button again, the display will
automatically return to the time of day after 10 seconds.
Brewing
1. Plug into 120V ~ 60 Hz outlet.
2. Make sure unit is in the OFF position. The LED Indicator Light
will be off.
IMPORTANT: Place coffee maker on a level surface.
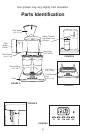
3. Markings on the Water Level Indicator indicate the amount of
water required to brew the desired number of Thermal Mugs.
Lift up the hinged Water Chamber Lid and fill to desired level
with cold, fresh water for the number of Thermal Mugs (one or
two), using the Water Level Indicator on the Water Window.
WARNING: When making one Thermal Mug, do not fill above
level 1.
IMPORTANT: If cream or milk will be added to Thermal Mugs,
use less water for brewing.
4. For optimal holding temperature, rinse the inside of Thermal
Mugs with warm water before brewing. Place Lids securely on
tops of Thermal Mugs. Press down on the Lids to ensure
proper fit.
NOTE: You can brew either one Thermal Mug or two Thermal
Mugs at once. Place Thermal Mugs snugly on Base of unit as
shown in Figure A (for two Thermal Mugs). The contoured
design on the Base should be used as a guide for Thermal
Mug alignment.
5. Insert a #2 paper cone filter into the Removable Filter Basket
and add coffee grounds. Use approximately 1
1/2-2 tablespoons
for each Thermal Mug of coffee. Close Water Chamber Lid,
snapping the Basket into place. (See Figure D.)
7