3.
10. To disconnect the appliance, switch the appli-
ance “OFF” and then remove the plug from the
wall socket.
11. Do not use the appliance for anything other
than its intended purpose.
12. Only use the appliance on a hard, flat and level
surface, to avoid interruption of air flow under-
neath the appliance.
13. Always ensure that the water reservoir cap is
tightened securely before switching the appli-
ance on.
14. Do not remove the water reservoir cap or the
brew basket until all the pressure has been re-
leased.
15. Warning: To reduce the risk of fire or electric
shock, do not remove any of the appliances’
casings. There are no user serviceable parts
inside. Repairs must only be done by an autho-
rized service centre.
16. This appliance is not intended for use by per-
sons (including children) with reduced physi-
cal, sensory or mental capabilities, or lack of
experience and knowledge, unless they have
been given supervision or instruction concern-
ing use of the appliance by a person respon-
sible for their safety.
17. Children should be supervised to ensure that
they do not play with the appliance.
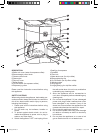
ESPRESSO and CAPPUCCINO
1. Unscrew the water reservoir cap.
2. Fill the water reservoir with the desired amount
of cold water.
3. Screw the water reservoir cap back on and en-
sure that it has been closed tightly.
4. Place the coffee filter into the portafilter.
5. Add the desired amount of ground coffee us-
ing the measure spoon provided with the cof-
fee machine (follow the markings inside the
coffee filter).
6. Place the portafilter back in position by insert-
ing it underneath the water outlet and turning it
anti-clockwise until it is firmly locked in place.
7. Place the carafe onto the drip tray.
8. Plug the appliance in and switch it on, the indi-
cator light will illuminate.
9. Wait for the “vapour” indicator light to illumi-
nate.
1. For espresso, turn the small knob on the top
of the appliance to the left (until the knob is
pointing to the coffee sign).
2. For cappuccino, pour milk into the milk cup
(no more than half full) and immerse the
steam nozzle into the milk. Turn the small
knob on the top of the appliance to the right
(until the knob is pointing to the steam sign).
This can be used for frothing milk and heating
up beverages.
NOTE: Switch off the steam nozzle before moving
the milk jug away by turning the steam knob clock-
wise. Do this to prevent contact with steam which
could result in injury.
10. We recommended that you clean the steam
nozzle immediately after each use to prevent
the build up of deposits.
Filter Coffee
1. Open the cover of the water tank on the top left
of the appliance.
2. Pour in the desired amount of water into the
water tank (no more than the overflow point).
3. Using the measuring spoon, add the desired
amount of ground coffee into the filter, then
close the cover, place the jug on the heating
base.
4. Switch the appliance on.
5. After use, switch off the appliance and unplug
it, allow it to cool down to room temperature
before undertaking any cleaning task.
CLEANING AND MAINTAINANCE
1. Before cleaning the appliance, please ensure
that the plug has been removed from the wall
socket.
2. Wipe the surface with a damp cloth. Do not
use any chemicals or abrasives to clean this
appliance.
3. Dismantle the steam nozzle and clean with wa-
ter.
4. Clean the funnel and filter nets with water.
DESCALING
In order to maintain the excellent quality of your
espresso and filter coffee machine we recommend
that you descale your appliance.
To prevent build-up of deposits especially in hard
water areas, do not leave water in the appliance.
The appliance should be regularly descaled at the
following recommended intervals:
NORMAL WATER: every 6 months
HARD WATER: every 3 months
1. Only use a decaling substance suitable for an
espresso machine and carefully follow the in-
structions.
2. Pour cold water together with 2 to 3 teaspoons
of decaling substance into the jug.
3. Remove the filter from the filter holder.
4. Replace the empty jug back onto the drip tray.
5. Turn the steam control knob clockwise to clean
the valve. Repeat the process if required.
29003_IM.indd 3 2013/08/05 11:15:01 AM