


5
4
HOW TO PREPARE QUALIT Y ESPRESSO AND CAPPUCCINO AT HOME
T
HE
C
OFFEE
The coffee should be a freshly ground, dark, espresso roast variety. You may buy
whole
coffee beans and grind them yourself at home using a MR. COFFEE
®
Burr Mill
or a MR. COFFEE
®
Bean Grinder. Store whole beans in an air-tight container, in a cool,
dark area. You do not need to store them in a refrigerator or freezer. If you buy pre-ground
coffee, plan to use the coffee within 7 to 8 days for best flavor. Store pre-ground coffee
in an air-tight container and keep in a cool, dark area.
T
HE
G
RIND
This is a vital step in the espresso making process. The coffee must be ground fine,
but not too fine. If you buy pre-ground coffee or have it ground, make sure you get an
espresso grind.
• The correct grind should look gritty, like salt or sand.
• If the grind is too fine, water will not flow through the coffee, even under pressure.
Coffee that is ground too fine looks like powder and feels like flour when rubbed
between your fingers.
• If the grind is too coarse, water flows through the coffee too fast,
preventing a full-flavored extraction.
T
HE
P
ROCESS
Your New MR. COFFEE
®
Espresso and Cappuccino Maker was designed to make
brewing
fresh espresso and cappuccino at home easy. Several hints will help you make quality
espresso and frothed milk drinks time after time. First, always start with fresh, cold water
in the water reservoir. Be sure that all parts of your machine are cleaned from previous uses.
You can preheat the cups you brew espresso into by rinsing them with hot water.
This will help keep your espresso hot after it is brewed.
The quality, roast, freshness, grind and origin of the coffee beans you use will vary the
taste of your espresso. When you brew espresso, the grounds should be “tamped” in the
filter cup. Tamping is the process of slightly packing the espresso coffee grounds down in
the filter cup. Your
MR. COFFEE
®
Espresso/Cappuccino Machine comes with a pre-measured
coffee scoop tamping tool.
NOTE:
Do not overpack the grounds.
Use the bottom of the scoop to slightly press the grounds down after placing them in the
filter cup (G). This will help you brew hot, rich, delicious espresso with perfect crema
(the golden layer on top of fresh-brewed espresso).
I
NTRODUC TION
C
ONGRATULATIONS
! You are the owner of a MR. COFFEE
®
Espresso and Cappuccino
Maker. Please read all
of the instructions in this manual carefully before you begin
to use this appliance.
Proper care and maintenance will ensure the long life of this
appliance
and its trouble-free operation.
Save these instructions and refer to them often
for cleaning
and care tips.
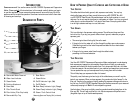
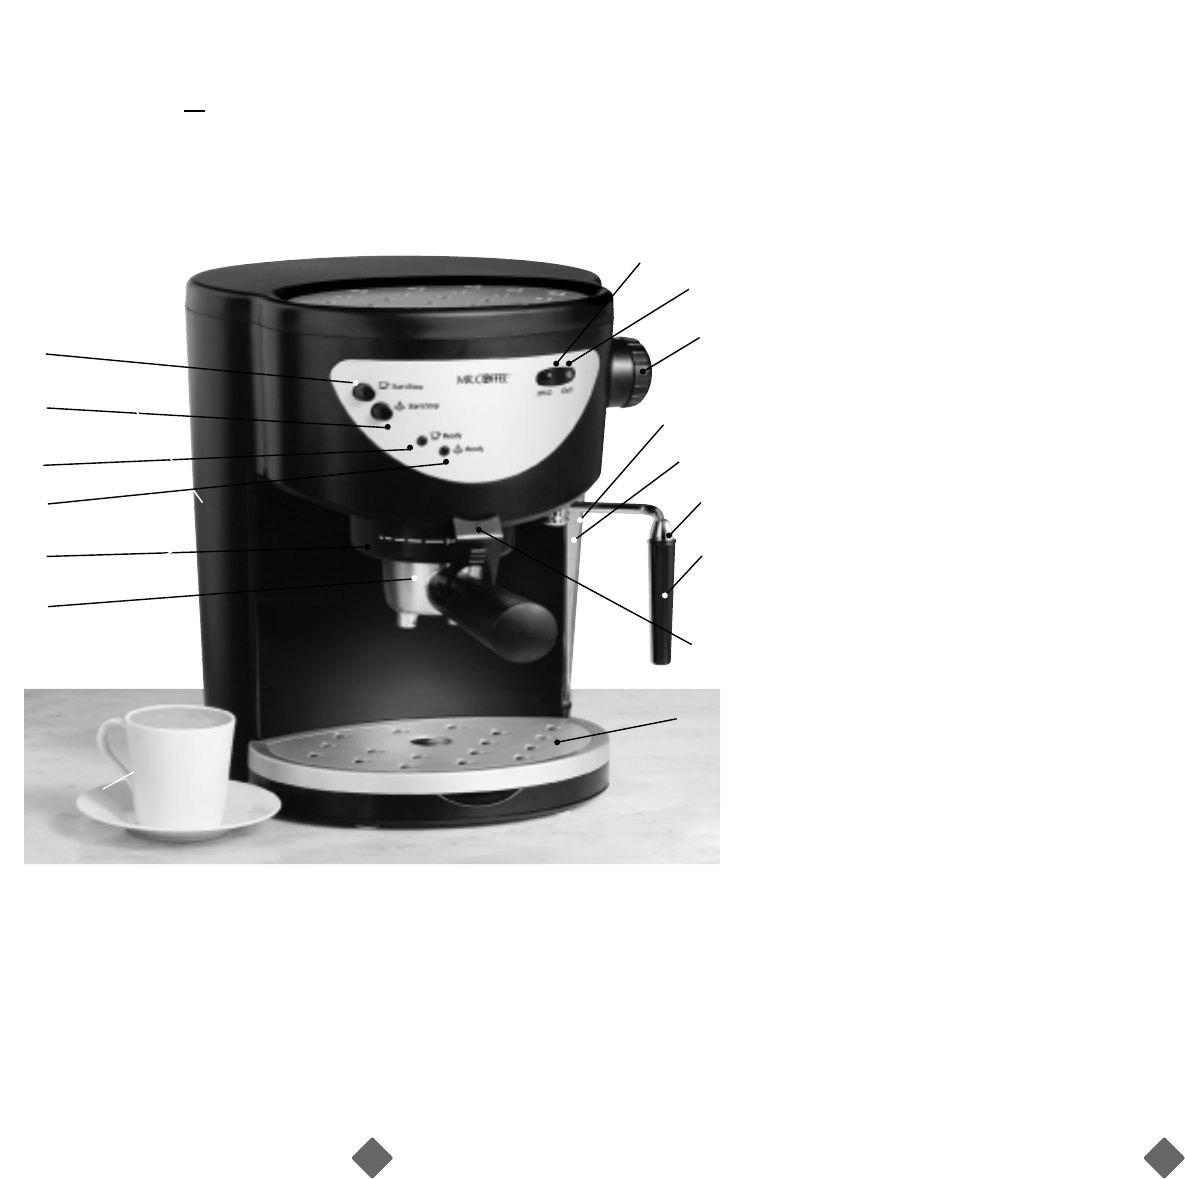
DIAGRAM OF PARTS
A. Removable Water Reservoir
B. Water Level Indicator
C. Steam Nozzle
D. Frothing Attachment
E. Brew Head
F. Filter Thumb Guard
G. Filter Holder (Filter Cup Inside)
H. Removable Drip Tray
I. Brew Button
J. Steam Button
K. On/Off Indicator Light (Red)
L. On/Off Switch
M. Brew Ready Indicator Light (Orange)
N. Steam Ready Indicator Light (Orange)
O. Steam / Froth Control Knob
Measuring Spoon and Tamping Tool (not shown)
K
O
L
N
G
J
M
B
A
C
D
E
F
H
I