


1312
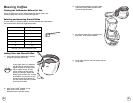
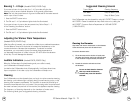
Brewing Coffee
If the clock display is flashing, refer to Section “Setting the Clock” before
continuing.
1. Open the swing-out brew basket to your left. Insert a MR. COFFEE
®
filter into
the removable black inner brew basket.
2. Add desired amount of coffee, referring to the Coffee Measurement Chart.
Shake lightly to level coffee.
3. Be sure the paper filter is centered before closing the brew basket.
4. Fill the decanter with cold water to desired capacity as marked on the side
of the decanter. (1 cup = 5 oz).
5. Pour water into your carafe. Note: For easy and accurate filling, please refer to
cup size markings located on the carafe. Pour the water into the water reservoir
and then place the empty carafe onto the warmer plate.
6. Turn your Coffeemaker switch to ON. When the coffee stops flowing, the
brewing cycle is complete.
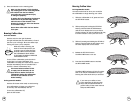
7. Carefully remove the black inner brew basket and discard the used grounds
and filter. Rinse the black brew basket and replace. Note: Remove decanter
from the warming plate before opening the swivel basket. This will prevent
the drip stop valve from catching on the decanter lid.
8. To make another pot of coffee, repeat Steps 1 – 7.
9. Turn your Coffeemaker off when the decanter is empty.
Warning: To avoid risk of personal injury or damage to property as a result of
overflow, be sure the decanter is squarely centered under the brew
basket during the brewing cycle. Brewed coffee and grounds, both
in brew basket and decanter, are very hot. Handle with care to avoid
scalding. If brew basket overflows, or if brew basket fails to drain
into decanter during brew cycle, do not open or handle basket.
Unplug Coffeemaker and wait for contents to cool before handling.
Important: Resetting Delay Brew at the Pre-Set Time
Due to a safety feature included in this unit, the programmable timer will not
automatically brew the next day after its last use. If the Delay Indicator Light in
the lower left hand corner of the clock display is not illuminated, then you will
need to reset the DELAY BREW feature by pressing the DELAY BREW button.
The programmable timer will not automatically brew the next day if left in the
AUTO position after its last use. This is a safety feature. If the OFF indicator light in
the lower right hand corner of the clock display is illuminated, reset AUTO BREW
by turning the control switch to OFF, then to AUTO. (Models ESX20, ESX23,
ESX20D, ESX23D Only)
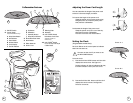
Setting Clock and Timer
(Programmable Models Only)
Note: You do not have to set your clock before the Coffeemaker will operate.
Plug in the power cord, press SELECT once to turn the Coffeemaker on. The ON
light will illuminate and the clock will stop flashing, but it will not keep time.
Setting the Clock
1. Plug the power cord into your electrical outlet. The clock display will flash
until you set the time.
2. Alternately press and hold the HOUR and MINUTE buttons until you reach
the current time.
3. The PM indicator light in the display will illuminate to indicate PM time.
Presetting the Brewing Time
1. You must first set the clock to the correct time before setting the desired time
for Delay Brew.
2. Press the SET/DELAY button, then alternately press the HOUR and MINUTE
buttons to set the time you want the Coffeemaker to start brewing.
The Delay Indicator Light will flash during this time.
3. Press the SET/DELAY button again to turn off the flashing light. If the
Delay Indicator Light is not flashing, pressing the HOUR or MINUTE buttons
will change the clock time.
Brewing Automatically at the Preset Time
1. Follow Steps 1 – 5 in the “Brewing” Section.
2. Press the SELECT button. The Delay Indicator Light should illuminate.
3. Brewing will begin at the preset time. The coffee will remain hot in
the decanter for 2 hours. To keep your coffee hot for an additional 2 hours,
press the SELECT button. The ON indicator light should illuminate.