


7
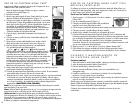
TROUBLESHOOTING YOUR
HOME CAFÉ
®
COFFEEMAKER
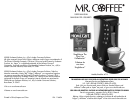
Your Home Café
®
Coffeemaker has been carefully designed to give you many years
of trouble-free service. In the unlikely event that your coffeemaker does not operate
satisfactorily, please review the following potential problems and try the steps
recommended BEFORE you call an Authorized Sunbeam Service Center.
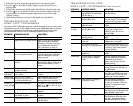
PROBLEM POSSIBLE CAUSE SOLUTION
Not Brewing The appliance is unplugged. Plug unit in.
Appliance has not been primed Allow to cool until red indicator
light comes back on and then
prime the unit as per “Preparing
your Coffeemaker Before First
Use” Instructions on page 4
There’s a power outage. Wait for power to be restored.
The water reservoir is empty Red stop indicator light blinks.
or is not properly seated. Push the Stop button, refill water
reservoir and begin new brew
using new pod.
The lid is not in the closed The red Stop indicator light blinks.
position. Press the Stop Button. Firmly close
the lid before selecting a brew
button.
The pod holder is not Insert Pod Holder correctly.
properly inserted.
Dispensing Pod and/or pod holder Make sure that the Pod Holder is
only water not in place. in place.
Not Brewing The unit is out of water. Refill the Water Reservoir. Start
enough coffee If the unit runs out of water, with a fresh cup and coffee
it will automatically stop pod and brew your next cup.
Coffee not Used a mild roast pod. Use either two mild blend pods for
strong enough 7 oz. or 9 oz. drink or try a
dark roast pod.
Too large cup size selected. Try using a smaller cup size
selection.
Coffee was brewed without Make sure that the Pod Holder is
pod holder in place.
in place.
Used same pod twice. Discard used pod. Place new pod
with flat side up.
8
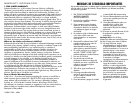
PROBLEM POSSIBLE CAUSE SOLUTION
Coffee taste The pod(s) may not have Discard used pod. Place new pod
been placedin the pod holder with flat side up.
with flat side up.
Damaged pod or regular Do not use damaged or torn pods.
ground coffee used. Use only Folgers
®
and Millstone
®
pods. Do not use ground coffee.
Water reservoir filled with Use filtered water for better tasting
unfiltered water. coffee.
Grounds Damaged pod or regular Use only Do not use damaged
in coffee ground coffee used. or torn pods. Folgers
®
and
Millstone
®
pods. Do not use
ground coffee.
Leaking The Water reservoir is not Secure the Water Reservoir in
properly placed. place.
Mineral deposits have built up Follow the “Decalcifying your
in the unit. Coffeemaker” instructions.
Pods inserted incorrectly Use the correct pod holder for the
or using the wrong pod holder. # of pods being used, insert pods
flat side up and properly placed
in the pod holder.
Dripping Brew Basket/Pod holder got Clean the Brew Basket and Pod
clogged up. holder.
Overflowing The pod holder is clogged or Red Stop indicator light blinks.
too many pods in the pod . Press the Stop Button, allow the
holder coffeemaker to cool down,
replace pod with new one and
resume brewing.
Unit noisy Pump in engaged. The noise you hear is part of the
normal function and operation of
the coffeemaker.
Water Reservoir is empty. Red Stop indicator light blinks. Press
Stop Button and fill the water reser-
voir with water. Turn the unit on by
making your cup size selection.
Red Stop Light Water Reservoir is empty or Red Stop indicator light blinks.
not properly seated
Press the Stop Button and seat
the reser
voir properly
, refill water
reservoir and begin new brew
using new pod.
The lid is open
Red Stop indicator light blinks.
Press Stop Button. Firmly close the lid
before selecting a brew button.
The pod holder is clogged Red indicator light blinks.
Press Stop Button. Allow the unit to
cool down, clean the pod holder
and star
t brewing with a new pod.
TROUBLESHOOTING YOUR
HOME CAFÉ
®
COFFEEMAKER (continued)
5. When the unit stops, empty the mug and return it to the brewing plate.
6. Press the 9 oz. Brew Button again. Empty the mug and return it to the
brewing plate.
7. Fill the water reservoir up to slightly below the MAX line with fresh, cold water.
8. Press the 14 oz. Brew Button to flush out the remaining solution. Empty the
mug and return it to the brewing plate. Repeat the process until the water
reservoir is empty.
9. Wash the Brew Basket as instructed in the Regular Cleaning Section.