


5
SETTING UP YOUR COFFEEMAKER
Congratulations on the purchase of your new MR. COFFEE
®
Coffeemaker! Please
read these instructions carefully before using your new coffeemaker. Proper use,
care and maintenance will ensure trouble-free operation and the long life of this
appliance. Save these instructions for cleaning and, if necessary, replacement parts
information.
OPERATION AND
USE
BEFORE F
IRST USE
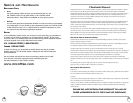
Before using your coffeemaker for the first time, wash decanter/lid and removable
filter basket using a mild, non-abrasive detergent and water. Rinse each thoroughly.
Follow Steps 3 – 5 (Brewing Coffee) using water, to clean the inside.
BREWING COFFEE
1. Lift the lid for filter basket and water reservoir access. Insert a MR. COFFEE
®
4-Cup paper or permanent filter into the removable filter basket.
2. Add desired amount of coffee, referring to the Coffee Measurement Chart.
(See Page 7) Shake lightly to level coffee. Be sure the filter is centered.
3. Fill the decanter with cold water to desired capacity as marked on the side of
the decanter (1 cup = 5 oz). To brew 4 cups of coffee, fill the decanter to the
4-cup line.
4. Pour the water into the water reservoir.
NOTE:
For easy and accurate filling,
refer to cup markings on the water windows. Place the empty decanter onto
the warming plate.
5. Plug the cord into the electrical outlet and turn your coffeemaker switch to the
“ON” position. When the coffee stops flowing, the brewing cycle is complete.
N
OTE
:
The warming plate will keep your coffee piping hot until you turn your
coffeemaker off.
6.
After contents have cooled, carefully remove the filter basket and discard
the used grounds and paper filter or rinse clean the permanent filter.
Rinse the removable filter basket and replace.
7. To make another pot of coffee, repeat Steps 1 – 6.
8. Be sure to turn your coffeemaker off when the decanter is empty and you
are no longer using your coffeemaker. Please unplug the power cord when
not in use.
W
ARNING
:
To avoid risk of personal injury or damage to property as a result of overflow,
be sure the decanter is squarely centered under the filter basket during
the brewing cycle. Brewed coffee and grounds, both in filter basket and
decanter, are very hot. Handle with care to avoid scalding. If filter basket
overflows, or if filter basket fails to drain into decanter during brew cycle,
do not open or handle basket. Unplug coffeemaker and wait for contents
to cool before handling.
4
T
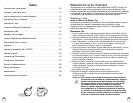
ABLE OF CONTENTS
Important Safeguards . . . . . . . . . . . . . . . . . . . . . . . . . . . . . . . . . 2
Decanter Use and Care . . . . . . . . . . . . . . . . . . . . . . . . . . . . . . . 3
Special Cord Set Instructions . . . . . . . . . . . . . . . . . . . . . . . . . . . 3
Setting Up Your Coffeemaker . . . . . . . . . . . . . . . . . . . . . . . . . . . 5
Operation and Use . . . . . . . . . . . . . . . . . . . . . . . . . . . . . . . . . . 5
Before First Use . . . . . . . . . . . . . . . . . . . . . . . . . . . . . . . . . . . . . 5
Brewing Coffee. . . . . . . . . . . . . . . . . . . . . . . . . . . . . . . . . . . . . . 5
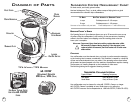
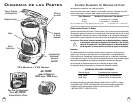
Diagram of Parts . . . . . . . . . . . . . . . . . . . . . . . . . . . . . . . . . . . . . 6
Suggested Coffee Measurement Chart . . . . . . . . . . . . . . . . . . . . 7
Brewing Pause ’n Serve . . . . . . . . . . . . . . . . . . . . . . . . . . . . . . . 7
Cleaning . . . . . . . . . . . . . . . . . . . . . . . . . . . . . . . . . . . . . . . . . . 7
Using MR. COFFEE
®
Cleaner . . . . . . . . . . . . . . . . . . . . . . . . . . . . 8
Using Vinegar . . . . . . . . . . . . . . . . . . . . . . . . . . . . . . . . . . . . . . . 8
Cleaning the Decanter . . . . . . . . . . . . . . . . . . . . . . . . . . . . . . . . 8
Troubleshooting . . . . . . . . . . . . . . . . . . . . . . . . . . . . . . . . . . . . . 9
Service and Maintenance . . . . . . . . . . . . . . . . . . . . . . . . . . . . . . 10
Replacement Parts . . . . . . . . . . . . . . . . . . . . . . . . . . . . . . . . . . . 10
Repairs . . . . . . . . . . . . . . . . . . . . . . . . . . . . . . . . . . . . . . . . . . . 10
Warranty Information . . . . . . . . . . . . . . . . . . . . . . . . . . . . . . . . . 11
coffee