


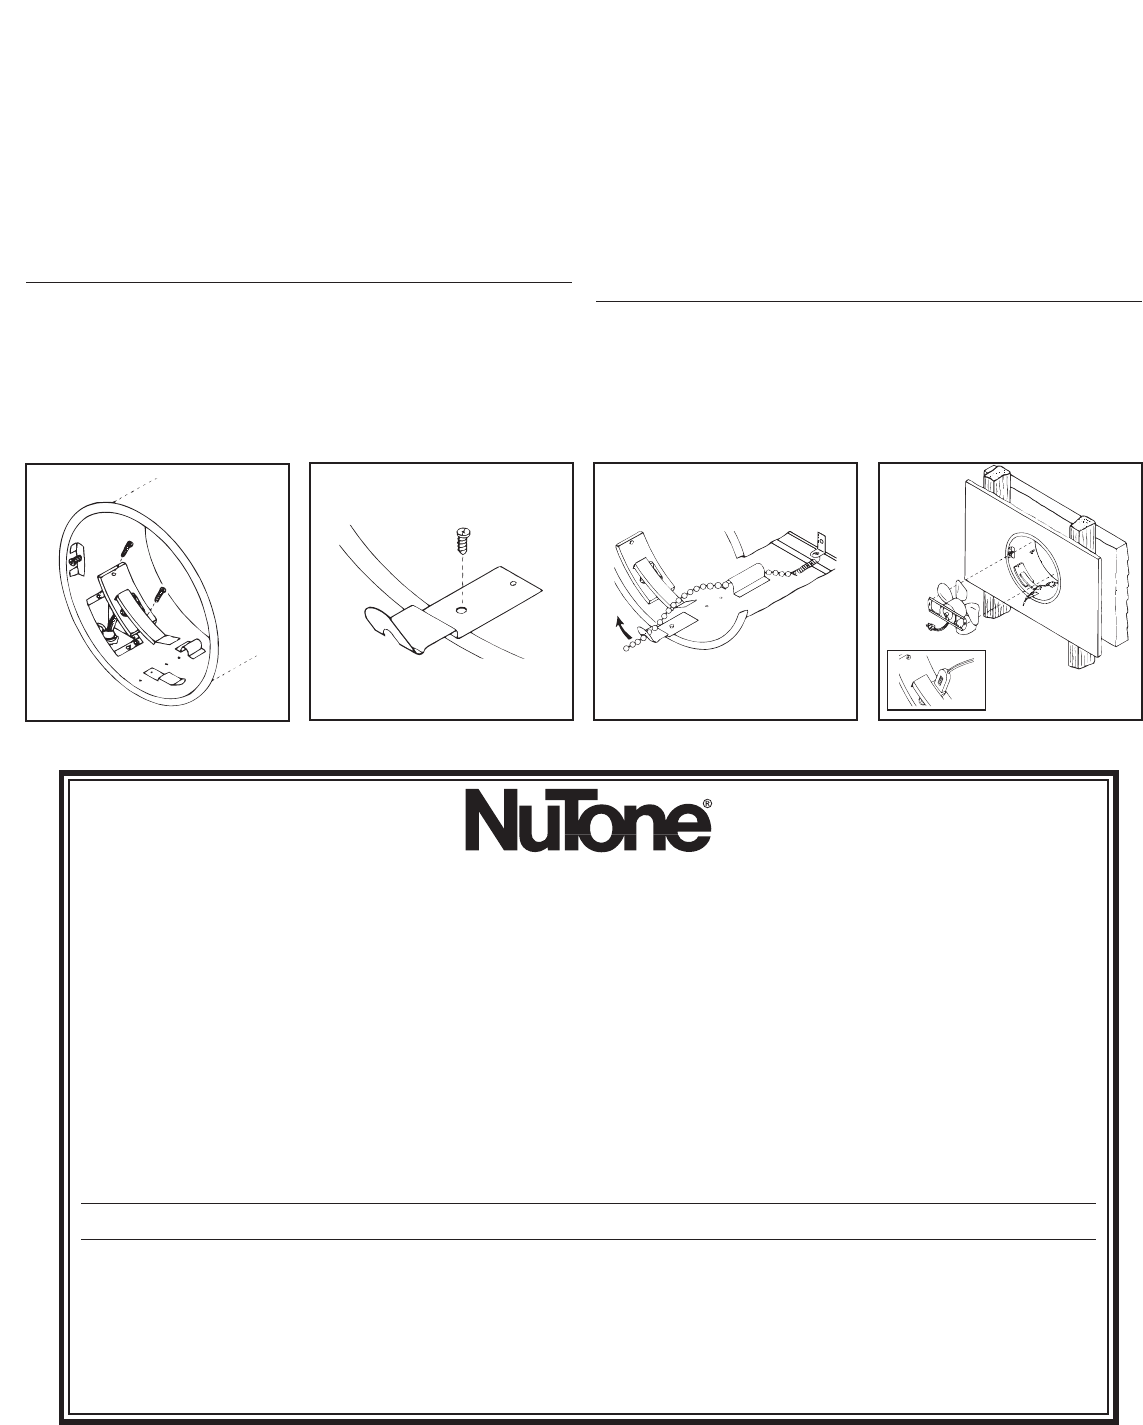
FIGURE 4 FIGURE 5 FIGURE 6
FIGURE 7
Product specifications subject to change without notice.
4820 Red Bank Road, Cincinnati, Ohio 45227
Printed in U.S.A., Rev. 05/02, Part No. 17862
One Year Limited Warranty
WARRANTY OWNER: NuTone warrants to the original consumer purchaser of its products that such products will be free from defects in materials or workmanship for a period
of one (1) year from the date of original purchase. THERE ARE NO OTHER WARRANTIES, EXPRESS OR IMPLIED, INCLUDING, BUT NOT LIMITED TO, IMPLIED
WARRANTIES OF MERCHANTABILITY OR FITNESS FOR A PARTICULAR PURPOSE.
During this one year period, NuTone will, at its option, repair or replace, without charge, any product or part which is found to be defective under normal use and service.
THIS WARRANTY DOES NOT EXTEND TO FLUORESCENT LAMP STARTERS OR TUBES, FILTERS, DUCT, ROOF CAPS, WALL CAPS AND OTHER ACCESSORIES
FOR DUCTING. This warranty does not cover (a) normal maintenance and service or (b) any products or parts which have been subject to misuse, negligence, accident,
improper maintenance or repair (other than by NuTone), faulty installation or installation contrary to recommended installation instructions.
The duration of any implied warranty is limited to the one year period as specified for the express warranty. Some states do not allow limitation on how long an implied warranty
lasts, so the above limitation may not apply to you.
NUTONE’S OBLIGATION TO REPAIR OR REPLACE, AT NUTONE’S OPTION, SHALL BE THE PURCHASER’S SOLE AND EXCLUSIVE REMEDY UNDERTHIS
WARRANTY. NUTONE SHALL NOT BE LIABLE FOR INCIDENTAL, CONSEQUENTIAL OR SPECIAL DAMAGES ARISING OUT OF OR IN CONNECTION WITH
PRODUCT USE OR PERFORMANCE. Some states do not allow the exclusion or limitation of incidental or consequential damages, so the above limitation or exclusion may
not apply to you. This warranty gives you specific legal rights, and you may also have other rights, which vary from state to state. This warranty supersedes all prior warranties.
WARRANTY SERVICE: To qualify for warranty service, you must (a) notify NuTone at the address stated below or telephone 1/800-543-8687, (b) give the model
number and part identification and (c) describe the nature of any defect in the product or part. At the time of requesting warranty service, you must present
evidence of the original purchase date.
Date of Installation Builder or Installer
Model No. and Product Description
IF YOU NEED ASSISTANCE OR SERVICE:
For the location of your nearest NuTone Independent Authorized Service Center:
Residents of the contiguous United States Dial Free 1-800-543-8687
Please be prepared to provide:
Product model number • Date and Proof of purchase • The nature of the difficulty
Residents of Alaska or Hawaii should write to: NuTone Inc. Attn: Department of National Field Service, 4820 Red Bank Road, Cincinnati Ohio 45227-1599.
Residents of Canada should write to: Broan-NuTone Canada, 1140 Tristar Drive, Mississauga, Ontario, Canada L5T 1H9.
Rev. 03/2001
INSTALLING THE WIRING
Refer to Figures 2, 3 and 4.
NOTE: For ease of installation in existing construction, the
outlet box is held in place with two screws and is removable to
allow for installation through a circular hole.
1. Run house wiring to the unit's outlet box. Use approved wire
connectors to make connections and be certain the unit is
properly grounded.
2. Position and secure outlet box cover.
INSTALLING THE "B" UNIT
Refer to Figures 5 and 6.
1. Turn chain catch bracket so front hole is in line with hole
in sleeve and fasten into place with screw provided.
2. Attach chain to the outside door. Hook the spring end
of the chain into bracket at bottom of outside door.
3. Thread chain through guard at bottom of sleeve, over switch
arm and through hole in chain catch. Pull door closed and
lock chain into catch.
4. Refer to Figure 7. Install motor and blade assembly with
motor leads towards receptacle in outlet box cover. Place
keyhole in motor bracket over mounting screws in tabs on
inside sleeve. Turn bracket so screws are in slots of keyhole
and tighten screws. Spin the blade to be certain
it turns freely and plug motor in.
5. Place grille so center hole is in line with hole of stud on
motor bracket. Insert thumbscrew and tighten securely.
6. Unhook the chain from catch and allow the door to
completely open. Cut chain to desired length and
attach pendant.
COMPLETING THE INSTALLATION
Caulk around the outside panel's flange to insure proper
weatherproofing of the unit.