


4
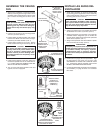
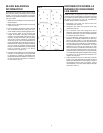
FIG. 5
INSTALE LAS ASPAS DEL
VENTILADOR
1. Attach motor assembly to mounting bracket. Slide
(2) mounting pins through holes in motor assembly
and mounting bracket. Use (2) cotter pins to secure
mounting pins as shown. (FIG. 5)
CAUTION
Cotter pins MUST BE USED to keep mounting
pins in place. Without cotter pins, the mounting
pins may come loose during operation and fan
may fall. Serious injury may result.
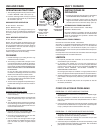
2. Asegure la caja de motor a la ménsula de montaje
del ventilador con cuatro (4) tornillos. (FIG. 6)
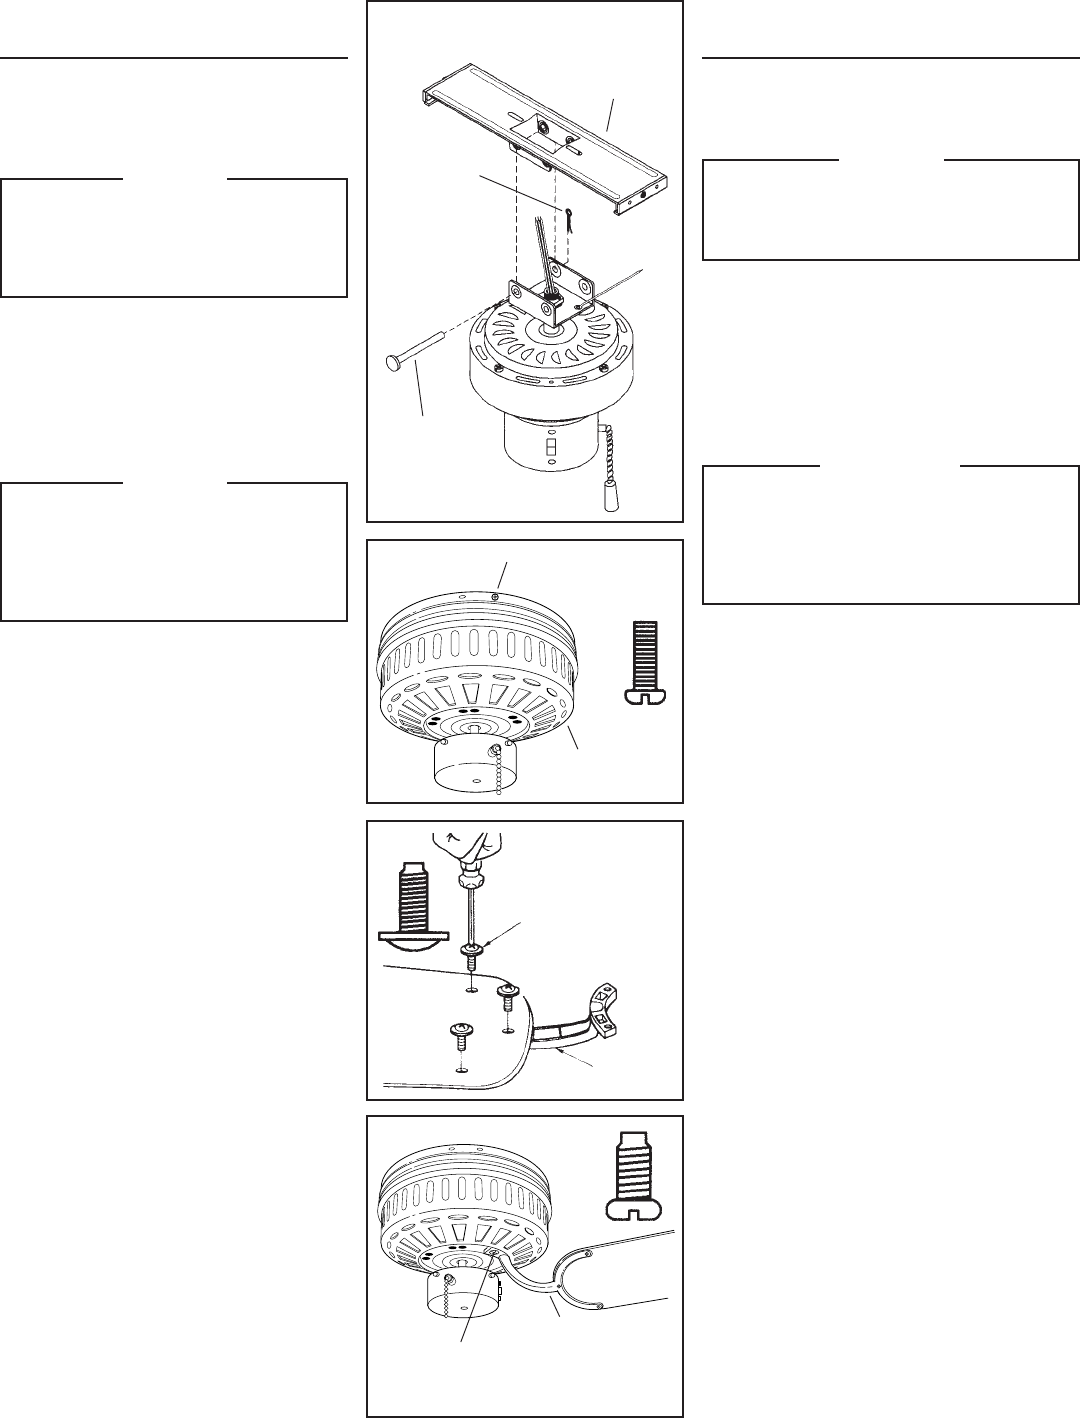
3. Asegure las aspas a sus soportes con tornilos de
arandela cabeza. Asegúrese que los tornillos de
montaje de las aspas estén firmemente apretados
dentro de los soportes. (FIG. 7)
4. Asegure los soportes al motor del ventilador. Apriete
bien los tornillos de montaje. (FIG. 8)
PRECAUCION
Las aspas y los soportes se han equilibrado con
cuidado para evitar el bamboleo cuando funciona
el ventilador. Maneje las aspas y soportes
cuidadosamente para no torcerlos. Soportes
torcidos son la causa principal del bamboleo del
ventilador.
5. Instale ahora el juego de luces opcionales. Siga
las instrucciones que vienen con el juego. USE
SOLAMENTE UN JUEGO DE LUCES DE LISTA
U.L. INDICADO PARA USARSE CON ESTE
MODELO DE VENTILADOR DE TECHO.
6. Conecte la electricidad y chequee el funcionamiento
del ventilador y el juego de luces si el ventilador
lleva luces.
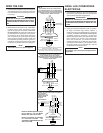
FIG. 6
FIG. 7
FIG. 8
FAN BLADE
ASPA
BLADE BRACKET
SOPORTE DE
ASPA
MOTOR HOUSING
CAJA DE MOTOR
MOTOR HOUSING SCREWS
(4) TORNILLOS DE
CAJA DE MOTOR (4)
BLADE
BRACKET
SOPORTE DE ASPA
BLADE BRACKET
MOUNTING SCREWS
TORNILLOS DE MONTAJE A
SOPORTE DE ASPA
FAN MOUNTING
BRACKET
MENSULA DE
MONTAJE DEL
VENTILADOR
COTTER PIN
CLAVIJA HENDIDA
MOUNTING
BRACKET PIN
PASADOR DE LA
MENSULA DE
MONTAJE
WASHER HEAD
SCREWS (3)
TORNILLOS DE
ARANDELA
CABEZA (3)
ASSEMBLE THE CEILING
FAN
1. Attach motor assembly to mounting bracket.
Slide (2) mounting pins through holes in motor
assembly and mounting bracket. Use (2) cotter
pins to secure mounting pins as shown. (FIG.
5)
CAUTION
Cotter pins MUST BE USED to keep mount-
ing pins in place. Without cotter pins, the
mounting pins may come loose during op-
eration and fan may fall. Serious injury may
result.
2. Fasten motor housing to fan mounting bracket
with four (4) screws. (FIG. 6)
3. Fasten blades to blade brackets with washer
head screws. Make sure that screws are tight-
ened firmly into blade backets. (FIG. 7)
4. Fasten blade brackets to fan motor. Tighten
blade bracket mounting screws firmly. (FIG. 8)
CAUTION
The blades and blade brackets have been
carefully balanced to prevent wobble when
the fan is operating. Handle blades and
brackets carefully to avoid bending them.
Bent blade brackets are the primary cause
of fan wobble.
5. Install optional light kit at this time. Follow the
instructions packed with the kit. USE ONLY A
U.L. LISTED LIGHT KIT MARKED FOR USE
WITH THIS CEILING FAN MODEL.
6. Turn on power and check operation of fan and
light kit, if fan is so equipped.
FAN
BLADE
ASPA