


HOWTOUSEYOUROSTER"COFFEEMAKER
PREPARING YOUR COFFEE MAKER FOR USE
l
Carefully unpack the coffee maker and remove all packaging materials
l
Before making coffee in your new
Oster@
coffee maker, thoroughly clean the carafe,
carafe lid and filter basket with warm, soapy water. Rinse and dry. Do not use harsh or
abrasive cleaners.
l
You may wipe the warming plate with a clean, damp cloth. However, do not immerse the
coffee maker in water or other liquid.
l
Prior to brewing your first pot of coffee, operate coffee maker once or twice with water
but without ground coffee or a paper filter. This will remove any dust that may have
.
settled inside the coffee maker which might affect the flavor of coffee.
IMPORTANT: Use cold water for best results.
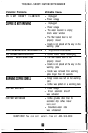
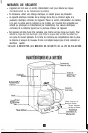
USING YOUR COFFEE MAKER’S CONTROLS
l
Clock/Timer Digital Display
-
Clock with AM/PM indicator.
l
Hour Advance -This button advances the hour display for the clock and timer.
See the section on “How to set the Clock” for proper use.
l
Minute Advance -This button advances the minute display for the clock and timer.
See the section on “How to set the Clock” for proper use.
l
Brew Preset
-
This button allows you to program the coffee maker up to
24 hours before the desired brewing time. See the section on “Delaying the Brewing
Cycle” for proper use.
l
On Light-This button indicates that power is going to the coffee maker,
and the coffee maker is in normal operating stage.
l
Auto Start Light -This button indicates the coffee maker is in delayed brewing
.
cycle stage, awaiting preset brew time.
l
Power Button -This button controls three power modes: ON/OFF/AUTO.
The OFF mode does not have a light indicator.
--