www.oster.com
6
www.oster.com
7
CARE & CLEANING
This appliance should be cleaned after every use.
1 Unplug the 3-cup chopper when not in use and before
cleaning. Never immerse the base, plug or cord in water or
other liquids. Allow the chopping blade to stop rotating
before disassembling.
2 Wash the bowl, lid, whisk, spatula and chopping blade in
warm soapy water. Rinse and dry thoroughly.
NOTE: Lid, bowl, blade, whisk and spatula can be placed in
the dishwasher.
CAUTION: Blades are sharp! Handle with care.
3 To clean the base, wipe the exterior with a damp
cloth or sponge. Dry thoroughly with a soft cloth.
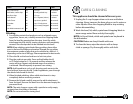
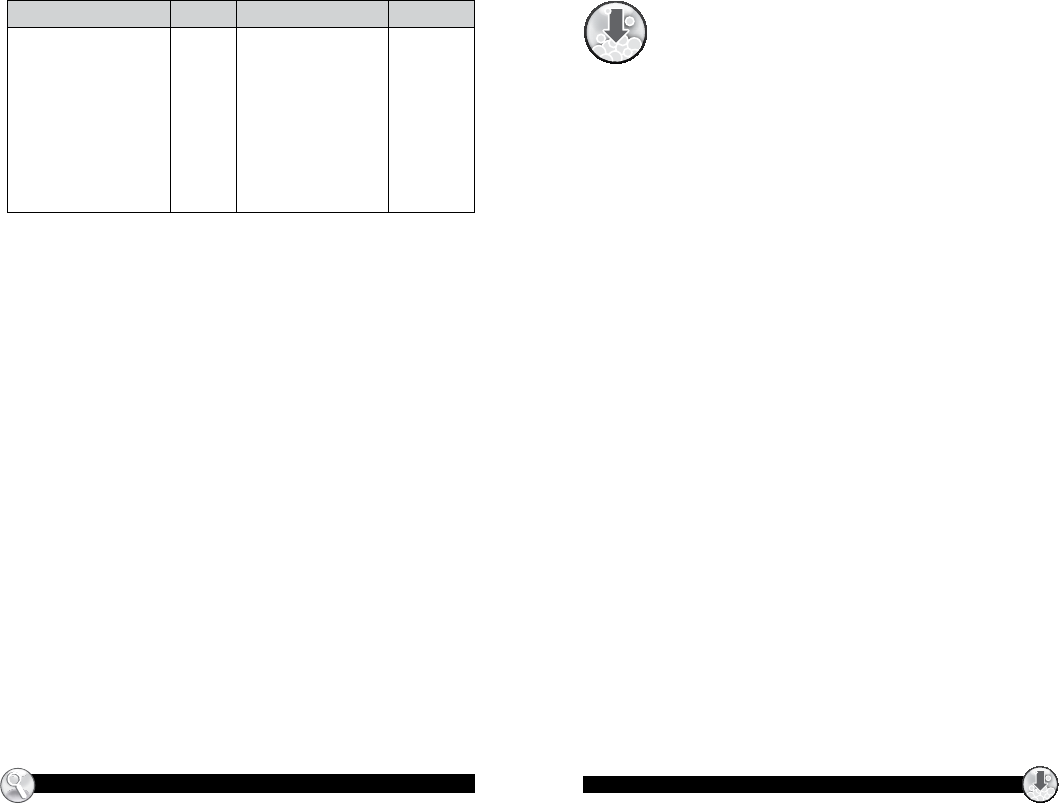
FOOD SETTING QTY TIME
Nuts, coarse chop
Fresh herbs, coarse chop
Nuts, ne chop
Hard cheeses
Garlic Cloves
Chocolate
Onion
Sun-dried tomatoes in oil
LO
LO
HI
HI
HI
HI
HI
HI
1 1/3 cup
1 loosely packed cup
1 1/3 cup
110–170 grams (4-6 oz.)
1 cup cloves, peeled
1 cup,1/2 inch pieces
1 cup, coarsely chopped
1 cup
10 seconds
1 minute
15 seconds
1 minute
20 seconds
30 seconds
20 seconds
30 seconds
Whisking
1 For whisking certain food products such as whipped cream,
egg whites, sauces, etc., carefully remove the chopping blade
from the bowl by grasping from the stem. Insert the whisk
attachment into the unit by turning clockwise until completely
secured. Place food product to be whisked into the bowl.
NOTE: When whisking certain foods like egg whites, please allow
room in the bowl for ung and aeration. Example: for egg whites
the maximum number of eggs that can be whisked at a time is 4–5
depending on the size of the eggs. Please experiment for best results.
2 Place the lid on the bowl and turn to lock into place.
3 Plug the cord into an outlet. Press and hold either the HI
or LO Pulse button for 5–10 seconds and then release; the
motor will stop. Repeat until desired stage of consistency
is achieved. Check frequently to prevent over-mixing.
NOTE: Add ingredients such as oil, dressings and sauces to the
bowl without removing the lid. To add ingredients, pour through
the drizzle hole found on the lid.
4 When nished whisking, allow whisk attachment to stop
completely before removing contents.
5 Remove the lid and carefully remove the whisk attachment
from the bowl. Remove the bowl from the base and empty the
processed food.
NOTE: The mini chopper comes with a spatula to easily empty
contents from the inside of the bowl.
NOTE: Do not use bowl for storing food.


