


English-4English-3
WELCOME
Congratulations on your purchase of an OSTER
®
Toaster!
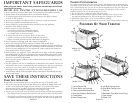
LEARNING ABOUT YOUR TOASTER
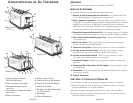
Your toaster includes the following technology and features:
1. Lighter/Darker Dial – Allows you to select how dark you would like your
food toasted.
2. Frozen Button and Indicator Light – Press this button if your food is frozen.
The toaster will automatically defrost your food and then toast it in one easy
step. The indicator will light to confirm your selection. Press toast lever down
then select button to begin the cycle. Toast is default setting.
3. Extra Long and Wide
Bread Slots – Wide slots (1.3 inches) allow you to toast
bagels, homemade bread,
English muffins and pastries.
4. Dual, Auto-Adjusting, Bread Guides – Automatically adjust to bread thickness.
5. Cancel Button – Press to pop the food out of the bread slots and stop the
toasting process.
6. Bread Carriage Lever – Press to begin toasting your food.
6a. Left Bread Carriage Lever – Press to begin toasting the two left bread racks.
(Model 6334 only)
6b. Right Bread Carriage Lever – Press to begin toasting all four bread racks.
(Model 6334 only)
7. Toast Lift – Perfect for retrieving the smallest of toasted items.
8. Removable, Easy-Wipe Crumb Tray – For convenient and easy clean up.
9. Cord Storage – Allows you to store extra cord under the toaster and out
of the way.
10. Power Cord
P
REPARING T
O USE YOUR TOASTER FOR THE FIRST TIME
If you are using your toaster for the first time, please be sure to:
1. Remove any stickers from the surface of the toaster and wipe the outside
of your toaster with a damp cloth.
2. Insert the removable crumb tray into the crumb tray slot.
3. Make certain that the bread carriage lever is in the uppermost position before
plugging in the toaster’s power cord.
4. Select a location for the toaster. The location should be:
• A flat, heat-resistant, non-flammable surface.
• At least three inches away from walls or the back of countertops.
• At least 1 foot from under cabinets.
• Away from flammable materials, such as curtains and wall fabric.
• Away from a gas stove flame or electric element.
5. Plug the power cord into 120 volt, 60 Hz AC outlet.
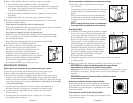
Adjusting the power cord length
Your toaster’s cord storage area allows you to adjust the length of the power
cord so that it is the exact length you desire.
To adjust the length of the power cord:
Wrap the power cord around the cord storage posts on the base of the toaster
until the cord is the length you desire.
Be certain to read “Power Cord Instructions” on Page English-1 for safety
information.
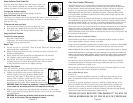
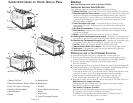
6. Without inserting any food into the bread slots,
push the bread lever all the way down until it locks.
(The carriage will not lock if the toaster is not plugged
into a power source.)
The first toasting process will preheat the new elements
and burn off any dust which may have accumulated during
storage. It is normal for this burn off to create an odor.
Your OSTER
®
toaster is now ready for use.
USING YOUR TOASTER
Inserting the food into the bread slots and toasting
Now you are ready to insert your food into the bread slots.
Keep the following tips in mind when inserting your food.
• Most types of breads and pastries can be toasted, such as bagels, tea cakes,
thickly sliced breads, English muffins, waffles, etc. Slices should not, however,
be
so thick as to jam the bread slots. Remember, the toast setting is the default setting.
•
When toasting two slices at a time, the slices should be of equal size and freshness
to ensure even toasting.
•
When toasting two slices of bread, place one slice in the center of each bread slot.
•
When toasting one slice of bread, place the slice in the center of either bread slot.
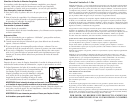
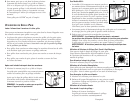
After you insert the food into the bread slots:
1.Press the bread carriage lever down until it locks.
The auto-adjusting bread guides will automatically
center the food for even browning.
After the desired level of darkness has been reached,
the food will pop up automatically and the bread
carriage lever will return to its original position.
NOTE: The Bread Carriage Handle will not stay down
unless the Toaster is plugged in.
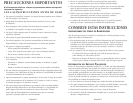
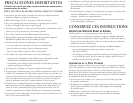
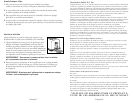
For Model 6334:
• Model 6334 has left and right bread carriage levers.
Pushing the left bread carriage lever will lower the two
left bread racks (See A). Pushing the right bread carriage
lever will lower
all four
bread racks (See B). If you
decide to toast four slices after choosing the two-slice
cycle, simply add the additional two slices and push
down the right bread carriage lever. The toasting
cycle
for all four slices will end at the same time based
upon
the Toast Shade Selection of the first two slices.
•
The left bread carriage lever is the toast lift for both the
right and left racks.
2.Carefully remove the toasted food from the bread slots.
WARNING: Toasted food can be very hot, especially pastry fillings.
Handle with care.
Tip: To remove food jammed in the bread slots, unplug the toaster
and remove the food once the toaster has cooled down.
WARNING: Never insert your fingers or metallic utensils into the bread slots.
M
ODELS
6325, 6325-33, 6327
MODEL 6334 (ONLY)
A B