


- 12 -
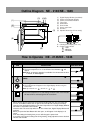
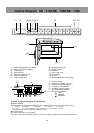
How to Operate NE - 2156/NE - 1856/NE - 1456
6
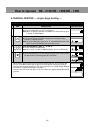
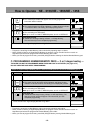
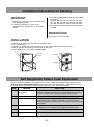
Press Power Level Selector pad once.
☛ The power level for 2nd stage will be indicated, 2nd Stage Heating
Indicator “2” will start to blink, and Heating Time Display will go blank.
PROG
21
7
Press Number/Memory pads “2”,“0” and “0”.
☛ The set heating time will appear.
Note:up to 15 min. on HIGH or MEDIUM power, 30 min. on DEFROST
2 0 0
PROG
21
8
Press Prog pad.
☛ “PROG” and 2nd Stage Heating Indicator “2” will stop blinking. The
total time for both stages will appear. This means that you have
completed programming.
PROG
21
• Three seconds later, Digital Display Window will go blank.
Note:
• Program the remaining Number/Memory pads as desired by repeating steps above.
• When “PROG” is blinking in Digital Display Window, the program can be cancelled and/or one touch on
Stop/Reset pad erases the programmed Number/Memory pad number.
• When you want to program the B side, press Shift (A/B) pad before pressing Number/Memory pad.
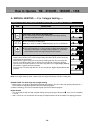
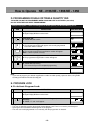
C. PROGRAMMING NUMBER/MEMORY PADS –– 2 or 3 stages heating ––
INSTRUCTION
DIGITAL DISPLAY WINDOW
PAD
Follow steps 1 to 5 above.
PROG
1
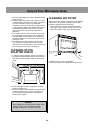
Example:To program cooking at DEFROST power for 1 minute and at HIGH power for 2 minutes into Number/Memory pad “5”
THE OVEN CAN NOT BE PROGRAMMED WHEN PROGRAM LOCK IS ACTIVATED! (see page 13-14)
DO NOT OPEN THE DOOR WHILE PROGRAMMING!
4
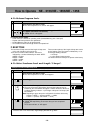
Press Power Level Selector pad three times.
☛ The selected power level will be indicated, 1st Stage Heating Indicator
“1” will start to blink, and Heating Time Display will go blank.
PROG
1
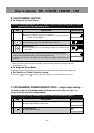
5
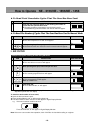
Press Number/Memory pads “1”,“0” and “0”.
☛ The set heating time will appear.
Note:up to 15 min. on HIGH or MEDIUM power, 30 min. on DEFROST
0 01
PROG
1
6
Press Program pad.
☛ “PROG” and 1st Stage Heating Indicator “1” will stop blinking.
This means that you have completed programming.
PROG
1
• Three seconds later, Digital Display Window will go blank.
Note:
• Program the remaining Number/Memory pads as desired by repeating steps 1-6 above.
• When “PROG” is blinking in Digital Display Window, the program can be cancelled and/or one touch on
Stop/Reset pad erases the programmed Number/Memory pad number.
• When you want to program the B side, press Shift (A/B) pad before selecting the desired Number/Memory pad.
3
Press Number/Memory pad “5”.
☛ The selected pad number will appear and currently programmed
information will be indicated.
5
PROG
1