


Custom Rev C —
Pelican Custom Premium WHWF 1354 / 1665
© 2013 Enviro Water Solutions, Inc.
3060 Performance Circle, Suite 2, DeLand, FL 32724
Page 10
www.pelicanwater.com
(877) 842-1635
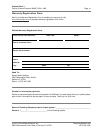
Whole House Water Filter Tank Installation
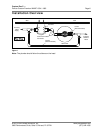
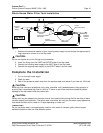
Figure 6
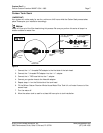
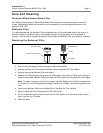
1. Determine the size and material of your incoming water supply line and choose the appropriate fit-
tings required to connect it to the filter head.
CAUTION:
Do not over-tighten any of the fittings during installation.
2. Install the fitting onto the INLET and OUTLET sides of the filter head.
3. Connect the incoming water supplyto the INLET side of the filter head.
4. Connect the outgoing water supply to the OUTLET side of the filter head.
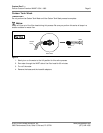
Complete the Installation
1. Turn on the main water supply.
2. Check for leaks.
3. Peel off the protective plastic wrap from the stainless steel tank jackets if you have the 1354 tank.
CAUTION:
Avoid high flow rates such as bathtub, utility sinks, hose bibs, multi-headed showers, body sprayers, or
anything that is considered high flow for the first 72 hours to avoid flow restrictions caused by carbon
blockage of the top basket inside the carbon tank.
CAUTION:
Carbon dust may be released into the water lines of the house/building during the first few days of water
use after carbon tank installation. The carbon dust is harmless, but may give the water a gray appearance
that should diminish within a week or 10 days depending on water use.
!IMPORTANT!
Do not use where water is microbiologically unsafe or with water of unknown quality without proper
disinfection before or after the filter/softener system.
IN
OUT
INLET
OUTLET
IN
OUT
Outgoing
Water to
House
Pre-Filter
Incoming
Water
Supply
Water Filter
Wall
Wall
Customer-Provided
Connection
Bypass
(Recommended)
Unions
(Recommended)