


Rev. D 5-11-01 3 P/N 99223000
The filter’s function is to remove suspended matter from the water and does not sanitize the water. For sparkling clear water the water
must be sanitized as well as balanced. Pool chemistry is a specialized area, and you should consult your local pool service specialist for
specific details. In general, proper pool sanitation requires a free chlorine level of 1 to 2 PPM and a PH range of 7.2 to 7.6.
Section III. Installation.
To install this filter system, you will need the following simple tools - screwdriver and pliers.
1. Carefully remove the equipment from the carton and check for any evidence of damage due to rough handling or shipping.
If any of the equipment is damaged, immediately notify the organization from where the equipment was purchased.
2. This filter system should be mounted on a level concrete slab, preferably concrete poured in a form or on a platform
constructed of concrete block or brick. Position the filter system so that the piping connections, control valve and drain
port are convenient and accessible for operation, service and winterizing.
3. Do not mount electrical controls (on/off switches, timers etc.) over the filter. You need to be able to stand clear of the filter
when starting the pump.
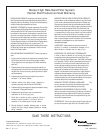
4. Media - Your sand filter uses a #20 grade Silica filter sand for its media
(.45 - .55mm). It should be free of all limestone or clay. Most pool supply
and building material stores carry Silica sand. See Table 1 for the
appropriate amounts of Silica sand for these filter systems.
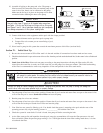
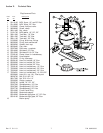
5. Install the sand funnel in the top of the filter tank and fill the tank about
half full of water. Pour the Silica sand into the top of the filter tank
slowly, so that the weight does not damage the lateral assembly in the
bottom of the tank.
6. After filling the filter tank with the appropriate amount of Silica sand remove the sand funnel and wash away any loose
sand from the opening of the filter tank.
7. Be sure that all sealing surfaces are clean on the filter tank. Apply a light coating of silicone based lubricant to the gasket
of the control valve and place the control valve over the opening in the top of the filter tank so that the center pipe slips
into the bore of the control valve.
8. Position the control valve so that the port locations are in the desired position. Control valve port locations are labeled with
the location they should be connected to.
9. Install the valve clamp halves over the flanges of the filter tank and the control valve. Ensure that the valve clamp halves
are securely installed over both flanges before attaching and tightening the two bolts and nuts. Tighten the two bolts and
nuts securely until both clamp halves touch.
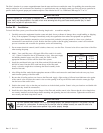
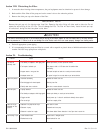
Table 1
Model Max. Filtration Amount
Area of Sand
18" Meteor 1.63 sq. ft. 65-100 lbs.
20" Meteor 2.0 sq. ft. 100-150 ibs.
22" Meteor 2.5 sq. ft. 150-200 lbs.
This filter operates under pressure. With the valve clamped properly and operated without air in the system, this filter
will operate in a safe manner. Air entering the filter and the valve not clamped correctly can cause the valve to be
blown off, which could cause severe personal injury and/or property damage.
WARNING
Failure to operate your filter system or inadequate filtration can cause poor water clarity obstructing visibility in your pool. Poor
water clarity may obscure objects in the water which while swimming and diving could cause severe personal injury or death.
Never swim in a pool with poor water clarity.
WARNING