


3
Operation & Installation Manual
Signature Series (HP15 model)
INTRODUCTION
Congratulations on your purchase of a Perlick residential
refrigeration product. Perlick has taken its expertise and experience
into creating the highest quality and most innovative residential
products on the market. Perlick’s product oering gives you the
opportunity to enjoy the functionality and user friendliness in
just about any room of your home, including kitchens, bedrooms,
entertainment rooms, basements and even bathrooms. All Perlick
products are built with commercial-grade stainless steel – providing
you with the beauty and durability for a lifetime of use.
This Installation and Operation Manual will answer your questions
about the features, operation and maintenance of your Refrigerated
Cabinet model. If you have questions that are not addressed here,
call 800 558-5592.
IMPORTANT : PLEASE READ all instructions completely before
attempting to install or operate the unit. First, as you follow these
Installation and Operation instructions, take particular note of the
DANGER!, CAUTION! and WARNING! symbols when they appear.
This information is important for the safe and ecient installation,
operation and care of your Perlick unit.
DANGER
Indicates a hazard that will result in serious injury or death if
precautions are not followed.
WARNING
Indicates a hazard may cause serious injury or death if
precautions are not followed.
CAUTION
Indicates a hazard where minor injury or product damage may
occur if you do not follow instructions.
Once the unit is completely installed, we suggest you keep this
manual and purchasing documentation in a safe place for future
reference. Should problems occur: refer to the troubleshooting
section of this manual. The information will help you quickly identify
a problem and get it remedied. In the event you require assistance,
please contact the dealer where you purchased your unit.
WARRANTY REGISTRATION CARD
To request information or service, the model number and serial
number must be provided. This information is located on the inside
ceiling of the unit and on the warranty registration card included
with information packet shipped with the unit.
IMPORTANT : Read through the included warranty statement
then complete and mail the Warranty Registration Card as
soon as possible to validate the registration date. Warranty
registration can also be done online at www.perlick.com. If
warranty registration is not completed, Perlick will use the date
of sale as the rst date of warranty for the unit. Please record the
purchase date of the unit and the dealer’s name, address and
telephone number below.
MODEL NUMBER: ____________________________________
SERIAL NUMBER: ____________________________________
PURCHASE DATE: ___________________________________
DEALER NAME & ADDRESS:
__________________________________________________
__________________________________________________
__________________________________________________
DEALER PHONE: ____________________________________
Table of Contents
Introduction ..........................................................................................................3
Warranty Registration .....................................................................................3
General Precautions .........................................................................................4
Installation Specications .............................................................................4
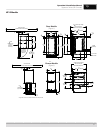
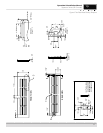
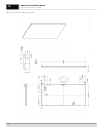
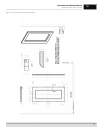
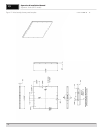
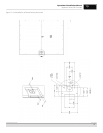
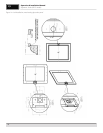
Overall Dimensions and Drawings .........................................................5
Preparing the Space ........................................................................................6
Preparing the Electrical Connections ...................................................6
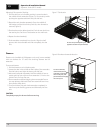
Unpacking and Moving .................................................................................6
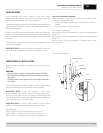
Anti-tip Brackets .................................................................................................7
Installation .............................................................................................................7
Shelving ...................................................................................................................8
Door Options .......................................................................................................11
Wood Overlay/Door Lock Installation ..................................................11
Wooden Wine Rack Trim Finishing .........................................................18
Operation ...............................................................................................................19
General .................................................................................................................19
Interior Light .....................................................................................................19
Loading Products ...........................................................................................19
Light Bulb Replacement ............................................................................19
Temperature Control Panel ......................................................................20
Adjusting the Setpoint ...............................................................................20
Checking Product Temperature ...........................................................21
Maintenance ........................................................................................................21
Cleaning ..............................................................................................................21
Cleaning the Condenser ...........................................................................21
Troubleshooting .................................................................................................22
Warranty ..................................................................................................................24