


Using the appliance
Making toasted sandwiches
1 Slightly grease the cooking plates with a little butter or oil.
2 Insert the mains plug into the wall socket.The red 'Power on' pilot light and the green 'Ready
to cook' pilot light go on (fig.4).
B
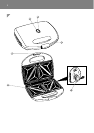
You can adjust the length of the cord by winding part of it round the cord storage facility.
3 Prepare the ingredients for the toasted sandwiches while the appliance is heating up.
B
For each sandwich you need two slices of bread and a suitable filling.Read the chapter 'Recipes' for
suggestions.
B
Slightly butter the sides of the bread that come into contact with the cooking plates to obtain an
even,golden brown result.
◗ The sandwich maker is ready for use as soon as the green 'Ready to cook' pilot light goes
out.
4 Open the sandwich maker.
5 Put the sandwiches to be prepared on the lower cooking plate (fig.5).
B
You can also toast only one sandwich, if you wish.
B
To ensure optimal sealing,fillings should not be spread too close to the edges of the slices of bread.
6 Close the sandwich maker (fig.6).
Lower the upper cooking plate carefully onto the bread until it locks automatically onto the lower
plate.
B
Note:While cooking, the green 'Ready to cook' pilot light switches on and off as an indication that the
heating elements are switched on and off to maintain the correct temperature.
7 Open the sandwich maker after 3-4 minutes to check whether the sandwiches are golden
brown.
B
The cooking time required to obtain crispy brown sandwiches depends on the type of bread, the filling
and your personal taste.
8 Remove the sandwiches (fig.7).
Use a wooden or plastic utensil (e.g. a spatula) to remove the toasted sandwich from the sandwich
maker.Do not use metal, sharp or abrasive kitchen utensils.
9 If you wish to continue making sandwiches,wait until the green 'Ready to cook' pilot light
goes out before putting new sandwiches in the sandwich maker.
10 Unplug the sandwich maker after use.
Cleaning
Never use abrasive pads to clean the cooking plates,as they will damage the non-stick coating.
1 Always unplug the sandwich maker before your start cleaning it.
2 Let the sandwich maker cool down properly in open position.
3 First remove excess oil from the plates with a piece of kitchen paper before cleaning.
4 Clean the cooking plates with a moist soft cloth or sponge (fig.8).
5 Use a wooden or plastic spatula to remove sticky food residues (for example solidified
cheese) from the cooking plates.
ENGLISH 7