


, During the hot air frying process, the heating-up light comes on and
goes out from time to time. This indicates that the heating element is
switched on and off to maintain the set temperature.
, Excess oil from the ingredients is collected on the bottom of the pan.
8 Some ingredients require shaking halfway through the preparation
time (see section ‘Settings’ in this chapter). To shake the ingredients,
pull the pan out of the appliance by the handle and shake it. Then slide
the pan back into the airfryer (Fig. 10).
Caution: Do not press the basket release button during shaking (Fig. 11).
Tip: To reduce the weight, you can remove the basket from the pan and shake
the basket only. To do so, pull the pan out of the appliance, place it on a heat-
resistant surface and press the basket release button.
Tip: If you set the timer to half the preparation time, you hear the timer bell
when you have to shake the ingredients. However, this means that you have to
set the timer again to the remaining preparation time after shaking.
9 When you hear the timer bell, the set preparation time has elapsed.
Pull the pan out of the appliance and place it on a heat-resistant surface.
Note: You can also switch off the appliance manually. To do this, turn the timer
control knob to 0 (Fig. 8).
10 Check if the ingredients are ready.
If the ingredients are not ready yet, simply slide the pan back into the
appliance and set the timer to a few extra minutes.
11 To remove small ingredients (e.g. fries), press the basket release
button (1) and lift the basket out of the pan (2). (Fig. 12)
Do not turn the basket upside down with the pan still attached to it,
as any excess oil that has collected on the bottom of the pan will leak
onto the ingredients.
After hot air frying, the pan and the ingredients are hot. Depending on
the type of ingredients in the airfryer, steam may escape from the pan.
12 Empty the basket into a bowl or onto a plate. (Fig. 13)
Tip: To remove large or fragile ingredients, use a pair of tongs to lift the
ingredients out of the basket (Fig. 14).
13 When a batch of ingredients is ready, the airfryer is instantly ready
for preparing another batch.
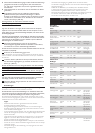
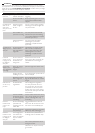
Settings
This table below helps you to select the basic settings for the ingredients
you want to prepare.
Note: Keep in mind that these settings are indications. As ingredients differ in
origin, size, shape as well as brand, we cannot guarantee the best setting for
your ingredients.
Because the Rapid Air technology instantly reheats the air inside the
appliance, pulling the pan briey out of the appliance during hot air
frying barely disturbs the process.
Tips
- Smaller ingredients usually require a slightly shorter preparation time
than larger ingredients.
- A larger amount of ingredients only requires a slightly longer
preparation time, a smaller amount of ingredients only requires a slightly
shorter preparation time.
- Shaking smaller ingredients halfway through the preparation time
optimises the end result and can help prevent unevenly fried ingredients.
- Add some oil to fresh potatoes for a crispy result. Fry your ingredients
in the airfryer within a few minutes after you added the oil.
- Do not prepare extremely greasy ingredients such as sausages in the airfryer.
- Snacks that can be prepared in an oven can also be prepared in the airfryer.
- The optimal amount for preparing crispy fries is 500 grams.
- Use pre-made dough to prepare lled snacks quickly and easily. Pre-made
dough also requires a shorter preparation time than home-made dough.
- Place the baking tray (HD9225 only) or oven dish in the airfryer
basket if you want to bake a cake or quiche or if you want to fry fragile
ingredients or lled ingredients (Fig. 15).
- You can also use the airfryer to reheat ingredients. To reheat ingredients,
set the temperature to 150°C for up to 10 minutes.
Automatic switch-off
This appliance is equipped with a timer. When the timer has counted
down to 0, the appliance produces a bell sound and switches off
automatically. To switch off the appliance manually, turn the timer knob
anticlockwise to 0.
Electromagnetic elds (EMF)
This Philips appliance complies with all standards regarding electromagnetic
elds (EMF). If handled properly and according to the instructions in this user
manual, the appliance is safe to use based on scientic evidence available today.
Before first use
1 Remove all packaging material.
2 Remove any stickers or labels from the appliance.
3 Thoroughly clean the basket and the pan with hot water, some
washing-up liquid and a non-abrasive sponge.
Note: You can also clean these parts in the dishwasher.
4 Wipe the inside and outside of the appliance with a moist cloth.
This is an airfryer that works on hot air. Do not ll the pan with oil or
frying fat.
Preparing for use
1 Place the appliance on a stable, horizontal and level surface.
Do not place the appliance on non-heat-resistant surfaces.
2 Place the basket in the pan properly (Fig. 3).
3 Pull the mains cord out of the cord storage compartment in the
bottom of the appliance.
Do not ll the pan with oil or any other liquid.
Do not put anything on top of the appliance. This disrupts the airow and
affects the hot air frying result.
Using the appliance
The airfryer can prepare a large range of ingredients. The recipe booklet
included helps you get to know the appliance. You can nd more recipes at
www.philips.com/kitchen.
Hot air frying
1 Put the mains plug in an earthed wall socket.
2 Carefully pull the pan out of the airfryer (Fig. 4).
3 Put the ingredients in the basket (Fig. 5).
Note: Never ll the basket beyond the MAX indication or exceed the amount
indicated in the table (see section ‘Settings’ in this chapter), as this could affect
the quality of the end result.
4 Slide the pan back into the airfryer (Fig. 6).
Never use the pan without the basket in it.
Caution: Do not touch the pan during and some time after use, as it gets
very hot. Only hold the pan by the handle.
5 Turn the temperature control knob to the required temperature.
See section ‘Settings’ in this chapter to determine the right
temperature (Fig. 7).
Note: If you want to prepare different ingredients at the same time, make sure
you check the preparation time and the temperature required for the different
ingredients before you start to prepare them simultaneously. Home-made fries
and drumsticks, for example, can be prepared simultaneously because they
require the same settings.
6 Determine the required preparation time for the ingredient (see
section ‘Settings’ in this chapter).
7 To switch on the appliance, turn the timer knob to the
required preparation time (Fig. 8).
Add 3 minutes to the preparation time when the appliance is cold.
Note: If you want, you can also let the appliance preheat without any
ingredients inside. In that case, turn the timer knob to more than 3 minutes and
wait until the heating-up light goes out (after approx. 3 minutes). Then ll the
basket and turn the timer knob to the required preparation time.
, The heating-up light goes on (Fig. 9).
, The timer starts counting down the set preparation time.