


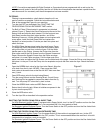


INITIAL ASSEMBLY:
Remove the two (2) screws that mount the rear of the tank to the cabinet. Place the Flue Heat Deflector in place
with the bend facing forward. Replace the tank mounting screws, through the Flue Heat Deflector into the tank. In
some cases the fryers legs may need to be installed.
ELECTRICAL CONNECTIONS: (Some machines do not require an electrical connection)
Pitco Frialators are manufactured to run on a particular electrical supply. Do NOT attempt to connect any fryer to
an electrical supply that is not indicated on the data plate on the inside of the door. All electrical connections must
be made according to the local codes and regulations .
INITIAL ADJUSTMENTS:
Thermocouple:
The pilot is set at the factory and requires NO further adjustment.
Gas Pressure (Only when Governors are installed.):
The gas pressure should be adjusted until the manifold
pressure reads the same pressure that is indicated on the data plate, located on the inside cover of the door.
Air Pressure
(RPB14 ONLY): Use a pressure gauge capable of measuring under 3 mbar. Adjust the air pressure
at each burner supply elbow to 2.21 mbar by adjusting the air slides at the blower.
Regulating Thermostats:
These are preset at the factory and DO NOT need further adjustment. Do NOT attempt
to make adjustments to this device.
Hi Limit Thermostats:
These are preset at the factory and DO NOT need further adjustment. Do NOT attempt to
make adjustments to this device.
INITIAL CLEANING:
Before filling any Pitco Frialator with oil, it is advised that it be thoroughly cleaned to remove any foreign particles
from the cooking area. The machine should be filled with water to at least, the minimum level. Add the sample
packet of Fryer Cleaner and set the temperature control between 90º and 100º C. Using the supplied brush and
the appropriate protective clothing, brush the inside of the fry tank until clean. When finished, turn the machine
OFF and drain, rinse the tank with fresh water and dry carefully. The machine should be filled with oil at this time
and all exposed surfaces coated with a small amount of cooking oil to prevent surface rust.
OPERATION:
COVERS:
In case of an oil fire in the fryer the cover can be used to place on top of the fryer to extinguish the flames. It
should be kept in a nearby location that is uncluttered and easy to reach.
FILLING THE FRY TANK WITH SHORTENING:
When using solid shortening, it must be cut into approximately 3 cm cubes and loosely packed around each of
the heat tubes. Be careful not to obstruct the optional float switch. If installed, it will be located in the bottom of the
fry tank at the rear as it must be allowed to float freely. Check that the oil level is at the minimum level once the oil
has melted.
LIGHTING THE PILOT:
On NON Electronic Ignition Fryers:
Turn the gas valve knob to the PILOT position and press inward. Light the
pilot flame. Continue to press the gas valve knob for approximately 15 to 30 seconds. The pilot should remain lit
when the gas valve knob is released, if NOT, try to reset the Hi-Limit and relight the pilot.
On Electronic Ignition Equipped Fryers:
The pilot does NOT require lighting, since the machine will do this
automatically.
RUNNING THE FRYER UP TO OPERATING TEMPERATURE:
GS Thermostat Equipped (The Thermostat is connected to the Gas Valve by 2 small gas lines):
Turn the gas
valve knob to the ON position and turn the Thermostat Dial to the desired level. The burners will automatically
bring the oil up to the cooking temperature. You may now cook with your Pitco fryer.
Digital Thermostat Equipped:
Turn the gas valve knob to the ON position and press the ON/OFF switch on the
Display. The Digital control will illuminate and bring the shortening up to the desired temperature. You may now
cook with your Pitco fryer.
Computer Equipped:
Turn the gas valve knob to the ON position and press the Switch to the ON position. The
computer display will come on and automatically bring the temperature up to the desired level and display
READY. You may now cook with your Pitco fryer.
4