


L20-246 Rev 0 (12/02)
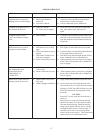
TROUBLESHOOTING
PROBLEM PROBABLE CAUSE CORRECTIVE ACTION
Computer does not come on A. Main circuit breaker is A. Locate the correct building circuit breaker
nothing shows in either display turned off and turn OFF and back ON again.
B. Fryer fuse is blown B. Call an Authorized Service Technician
Computer heat light comes on A. If the oil is hot the A. Allow the oil to cool, reset the Hi Limit and
but elements do not heat Hi - Limit may be tripped turn the computer OFF and back ON
again.
Computer display shows A. Bad computer A. Locate the correct building circuit breaker and
"OFF" and cannot be turned turn OFF and back ON again. If this does not
"ON". reset the computer call an Authorized Service
Technician.
RED return valve is open no A. RED return valve not fully A. Pull slightly on the RED return valve handle
pump sound can be heard open
B. Filter circuit breaker may be B. Locate the filter circuit breaker behind the door
tripped of the left hand fryer and reset it.
C. Filter motor Thermal Over- C. Push RED reset button located on end of filter
load may be tripped motor, behind the door of left hand fryer.
D. Sensor switch may be loose D. If the mounting screws are loose try to tighten
them, if this is not possible call an Authorized
Service Agency.
Drain valve is closed and A. GREEN drain valve is not A. Apply a little more pressure to close the valve
the computer has been fully closed
reset but still shows B. Sensor switch may be loose B. If the mounting screws are loose try to tighten
"DRAINING" or them, if this is not possible call an Authorized
"TURN OFF" Service Agency.
Drain valve is open, the oil is A. GREEN drain valve is not A. Apply a little more pressure to open the valve
draining slowly or not at all. fully open
B. Drain is plugged with debris B. Use the clean out rod to clear the drain valve
from inside the fry vat. If this does not clear the
blockage, CLOSE the GREEN drain valve and
follow the instructions for clearing the main
drain line.
CAUTION:
Some HOT oil may come out when the cap is
removed.
Remove the two wing nuts from the end cap
(do NOT lose these.) Use the clean out rod to
clear the main drain tube. Install the end cap
along with its gasket and four screws. Do not
overtighten these screws or remove drain "T"
cleanout access covers, by removing thumb
screws (do not loose screws). Then clean drain,
replace access cover and thumb screws.
9