


A short supply cord is provided to reduce the hazards resulting from becoming entangled in or tripping over
a longer cord. An extension cord may be used if care is exercised in its use. If an extension cord is used, the
marked electrical rating should be at least as great as the electrical rating of the tea kettle. The extension cord,
if used, should be arranged so that it will not drape over the countertop or tabletop where it can be pulled on
by children or tripped over accidently.
Whistle Performance: If you wish to hear the whistle, boil 2 to 4 cups of water each time you use the tea kettle. As
the volume of the water in the tea kettle increases, the sound level of the whistle intensifies, When using less than
2 cups of water in the tea kettle, the whistle will function, however, it will be very faint sounding. Once the water
level drops to the 1 cup level, the sound of the whistle will disappear completely.
How To Use
Always be sure the tea kettle is unplugged from the wall outlet before filling
with water.
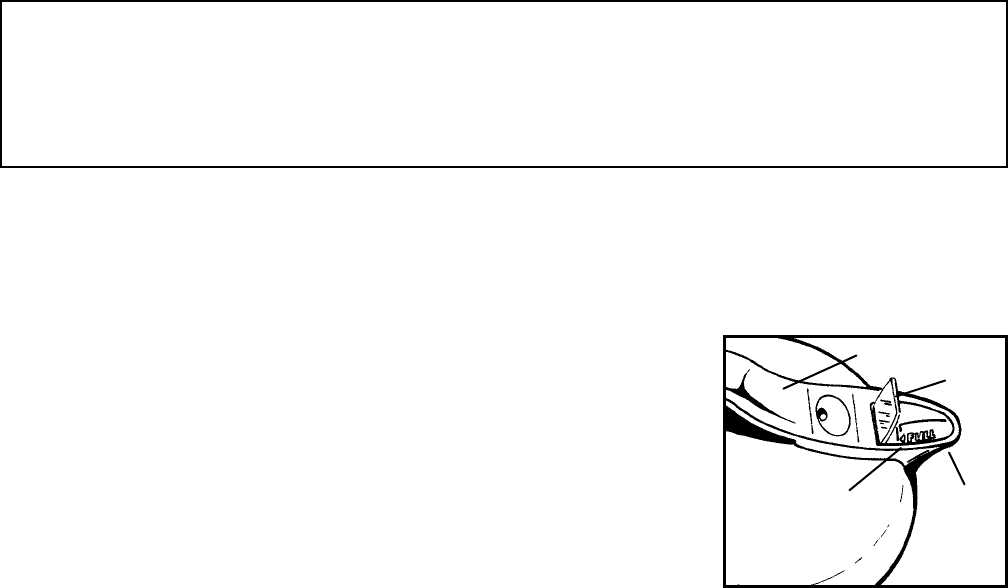
1. Lift the spout lid and tilt back toward the handle. Fill with 2 to 4 cups of
water; do not fill above the full mark (Fig. A). Overfilling may result in hot
water boiling out the spout. Plug cord into 120 volt AC wall outlet.
2. Use the tea kettle on a dry, level, heat resistant surface, away from countertop
edge.
NOTE: Before using the heated water for consumption for the first time, boil
one kettle full of water and discard. It may contain some manufacturing oil or
residue. Do not use any soap or cleaning compounds in the water.
3. The water will begin to boil in a few minutes and will continue to boil until the cord is disconnected or all the
water has evaporated. The whistle will begin to sound as the water begins to boil and will continue until the
water drops to the 1 cup level. Do not plug the whistle hole or attempt to change the whistle in any manner as
this will result in boiling water being ejected out the spout.
NOTE: Should the tea kettle boil dry or be accidentally plugged in empty, it is protected against damage by its
automatic re-setting thermostat that will turn off the heating element. If this occurs, disconnect the cord and allow
to cool before refilling with water.
4. Keep hands away from escaping steam and use caution when pouring hot water from the tea kettle.
5. Do not attempt to heat any liquids other than water.
6.
Always disconnect cord from wall outlet before pouring, to prevent boiling water from surging out the
spout.
7. Empty any unused water while still hot to reduce scale buildup.
NOTE: The inside of this tea kettle is specially coated to prevent discoloration. Mineral content in water varies from
place to place and in some areas may still cause discoloration. The discoloration will not affect the taste or quality
of the water. Always empty all unused water after each use.
In addition, water with high mineral content may tend to bubble more excessively and possibly boil out the spout. If
this occurs, reduce maximum fill by
1
⁄
2
cup, or so water comes to the bottom of the full mark.
Care and Cleaning
1. Under normal use, a deposit of scale may form on the inside of the tea kettle. This scale buildup can be
delayed by pouring out old water after each use and then refilling with fresh water when using again. If the tea
kettle is used on a daily basis, clean the inside once a month to remove mineral deposits. If the water in your area
is quite hard, more frequent cleaning may be necessary.
2. To remove the scale deposit, boil one cup of vinegar and one cup of water in the kettle for five minutes.
Unplug and allow to stand for 15 minutes. Empty tea kettle and rinse thoroughly. If mineral buildup is quite
severe, repeat cleaning process with fresh vinegar and water. Always rinse thoroughly after cleaning.
3.
Never use soap or other cleaning solutions in this kettle.
4. Wipe the exterior of the tea kettle with a soft damp cloth. Do not scour surfaces with steel wool or abrasive
cleaners. Never immerse in water or other liquid.
2
Spout
Spout
Lid
Handle
Fig. A
Full Mark