


6
Helpful Hints
If unit fails to preheat or if the cooking process stops:
1.
Check cord assembly to assure magnetic plug is attached to the appliance and the cord is plugged into
the wall outlet.
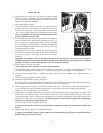
2.
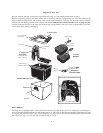
Check to see that both guides on the front of the control unit are properly positioned in the tracks on
the back of the base (see Fig. E and Fig. F, page 5).
3.
The reset button may have tripped. The deep fryer is equipped with a sensor which will automatically
shut the unit off if it is heated without oil or with insuf cient oil. Older oil that has become thick may
not conduct heat well and may also cause the sensor to trip and the unit to shut off. Should any of
these things occur, unplug and allow the unit to cool. Then with the tip of a pen or pencil, press the
red RESET button on the back of the control unit (see Fig. A2, page 3). The unit will not operate until
it is reset. Before plugging the unit back in, make sure there is suf cient oil in the fryer, or if the oil
is old, replace the oil with fresh oil.
When using fryer for the rst time, a slight odor or light smoking may occur as manufacturing residue evaporates.
This is normal during initial use.
Fry foods of equal size and thickness as they will fry more evenly and at the same speed.
Do not ll the baskets more than
3
⁄
3
⁄
3
4
⁄
4
⁄
full. If too much food is fried at the same time, the food will not get crisp.
For crisper foods, fry without the cover.
Before deep frying, always remove excess moisture or ice crystals from food by blotting with toweling. Moist
foods may cause excess foaming, spattering, and crackling.
14.
When frying time has elapsed, check that the food is golden brown. Then lift the baskets and hook them onto the
fryer rim to allow oil to drain from food.
15.
Empty the food onto absorbent paper. Season to taste.
16.
If frying additional food, repeat steps 11 through 15. If signal light is on, allow oil to reheat until signal light goes
out.
17.
When frying is completed, unplug cord from wall outlet and then from deep fryer. Allow oil and fryer to cool
completely before removing control assembly and before cleaning.
Care and Cleaning
1.
After unit and oil have cooled completely, carefully lift control assembly out of fryer and wipe with a damp cloth
to clean.
Never immerse the control assembly in water or wash in a dishwasher.
2.
Then, grabbing two opposite corners of the removable pot, carefully lift it out of the deep fryer.
If you plan to reuse the cooking oil, it is recommended that you strain the oil to remove any food particles. Then
store the oil in a tightly sealed container and keep where it will not be exposed to heat or direct light.
3.
Wash the removable pot, frying baskets, fryer cover, and base in dishwasher or in warm, sudsy water. Note:
If you choose to use a dishwasher, there may be some discoloration of parts. This will not affect the fryer’s
performance.
Do not use steel wool scouring pads or abrasive kitchen cleaners on the removable pot, cover, or base and do not
use bleaching agents to clean the frying baskets.
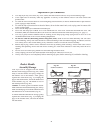
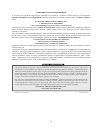
If desired, the basket handles may be removed for cleaning. Squeeze the drain hooks and fold the handle into the
basket until the handle bars are out of the brackets. Continue squeezing to remove both pegs from the bracket
holes. After cleaning, reattach handle making sure both pegs are in the bracket holes and the handle bars are in
the brackets (see Fig. D, page 4). Fold handle into basket for storage (see Fig. B1, page 4).
Note:
Your fryer has a grease lter in the cover. The lter does not need replacing. It can be cleaned periodically
with a brush.
4.
Before reassembling unit, be sure all parts are completely dry.
5.
Always check the magnetic plug before use to assure metal items have not become attached to the magnet.