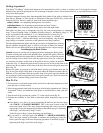
If your knife just needs a little touch-up sharpening, begin with STAGE 3 – HONING. This is the stage located on the right.
This will be the stage most frequently used. It completes the knife sharpening process by honing and polishing the knife to an
exact razor sharp edge. Follow the sharpening procedure as described below, using only the slots in Stage 3. Then complete
the honing process with one quick pass (approximately one second) through both slots of Stage 3.
5. Begin sharpening. The sharpening procedure is the same for each stage.
Sharpening Procedure
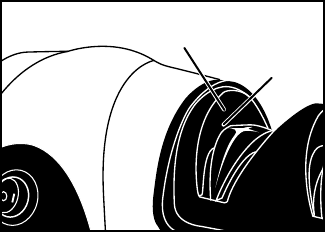
Begin by placing the knife in the left slot of the stage in use, so the side of the blade rests against the outside face (Fig. F) and
the cutting edge makes contact with the bottom of the sharpening slot (Fig. E). The outside face of each sharpening slot acts as
a guide to insure that the knife is positioned at the perfect sharpening angle. For best results, do not stand directly in front of
Stage 2 during sharpening; instead, if you are right handed, stand slightly off to the
left of Stage 2 and if you are left handed, stand slightly off to the right of Stage 2. This
will make it easier to draw the knife through the guide slots.
Slowly draw the knife towards you through both the left and right slots three times,
alternating passes between the two slots. When sharpening the tip of the blade, lift up
on the knife handle slightly as the curved portion of the blade is drawn through the
slots. Note: The greater the curve on the blade the more you will need to lift up on the
handle; the less the curve, the less you will need to lift up on the handle. Certain blades
may not have a curve and therefore it will not be necessary to lift up on the handle as
you draw the tip through the slots.
When drawing the knife through the slots, allow approximately one second for each two inches of blade. For example, if
sharpening a knife with a 6-inch blade, you should take approximately three seconds for each pass.
6. Before using the knife to slice food, always wipe the knife blade with a damp cloth to remove metal filings that may have
deposited during sharpening.
7. If knife does not slice food with ease, repeat Stages 2 and 3.
8. When sharpening is completed, turn the unit off by pressing the symbol
“ O” on the on/off switch.
Note: With normal use, you may notice small cuts appearing at the front base of the knife slots. These are normal and should not
affect the knife sharpening procedure.
CAUTION:
Do not run fingers along edge of knife to check sharpness. To avoid injury, handle knives with extreme care.
Never insert the tip of the knife into the blade guide first and push through. This could damage the knife sharpener and
your knife.
Before using the knife to slice food, always wipe the knife blade with a damp cloth to remove any metal filings that may
remain from the sharpening process.
Questions And Answers
How often should I sharpen my knives?
Hone (Stage 3) the knife prior to each use if you want to maintain a razor sharp edge. After extensive use, if you have honed the
knife and it no longer slices food with ease, run the knife through Stages 2 and 3.
How do I get an even edge on my knife?
To get an even edge when sharpening, be sure to place the knife in the slot so the side of the blade rests against the outside face
(Fig. F) and the cutting edge makes contact with the bottom of the sharpening slot (Fig. E). The outside face of each sharpening
slot acts as a guide to insure that the knife is positioned at the perfect sharpening angle. For best results, do not stand directly
in front of Stage 2 during sharpening; instead, if you are right handed, stand slightly off to the left of Stage 2 and if you are left
handed, stand slightly off to the right of Stage 2. This will make it easier to draw the knife through the guide slots.
Allow adequate time for sharpening. When drawing the knife through the slots, allow approximately one second for each two
inches of blade. For example, if sharpening a knife with a 6-inch blade, you should take approximately three seconds for each pass.
Pulling the knife through too quickly may result in an uneven edge.
When sharpening the tip of the blade, lift up on the knife handle slightly as the curved portion of the blade is drawn through the
blade guides. Note: The greater the curve on the blade the more you will need to lift up on the handle; the less the curve, the less
Fig. F
Outside face
of left slot
Inside face
of left slot
3


