


Getting Acquainted
Before initial use, and after each subsequent use, wash all parts
except the motor housing in warm, sudsy water. Do not wash
parts in a dishwasher.
Wipe the motor housing with a damp cloth to clean. Never im-
merse the motor housing in water or any other liquid.
How To Use
1. Select a recipe from the ones listed on page 3 or prepare
one of your own.
2. Add liquid ingredients, sweetener, and ice cubes to the
pitcher first. Use the markings on the side of the pitcher as
a guide. Each line represents one cup.
3. Cut fruit (citrus fruits) in half crosswise.
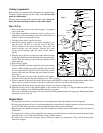
4. Attach the stirring paddle to the motor housing by fit
-
ting the tabs, see Fig. A, into the slots in the hole
on the bottom of the motor housing. Now place the
motor housing over the pitcher, aligning the spout
on the motor housing with the spout on the pitcher,
Fig. B.
5. Place the juice collector over the post on the motor housing
so the juice chute fits into the opening of the motor housing,
Fig. B. Then place the post cap on the post and the reamer
on the post cap.
6. Plug cord into outlet.
7. Press the ON/OFF switch to begin the juicing and stirring
process. While holding the pitcher handle with one hand,
use your other hand to place one half of the fruit over the
reamer. Hold onto the rind side and press down to extract
juice, Fig. C.
Note: The reamer may turn both clockwise and counter-
clockwise during the juicing and stirring process. This is normal.
8. When it appears all the juice has been extracted, press the ON/OFF switch to stop the lemonade maker. Allow
unit to sit for a couple of minutes so the juice in the juice collector can drip down into the pitcher.
9. Unplug unit and lift the motor housing, juice collector, and reamer off the pitcher.
10. Place the serving cover on the pitcher tightly so the strainer area, see Fig. A, is aligned with the pitcher spout.
The juice is ready to serve. Hold the pitcher handle as you pour.
The cover is intended to fit snugly. For easy removal, hold the pitcher handle and using your thumb gently push
up on the cover to lift it off.
Helpful Hints
• For best juice extraction, use fruits that are room temperature rather than right from the refrigerator.
• If juicing several pieces of fruit, it is recommended that you periodically clean the reamer to remove excess pulp
and seeds. This allows the juice to flow through the juice collector more efficiently.
• Because this juice maker is sensitive to heat, do not add hot or boiling water to the pitcher. Also do not wash in
dishwasher.
• For larger pieces of fruit, such as grapefruit and oranges, you will need to move the fruit around the reamer while
pressing down, so all of the fruit can make contact with the reamer.
• For best results, choose juice oranges, such as Valencia oranges, for orange juice. They will yield more juice
than navel oranges.
2
Fig. C
Fig. B
Juice
chute
Post cap
Post
Reamer
Spout
Pitcher
spout
Opening
Juice
collector
Fig. A
Reamer
Storage cover
Post cap
Juice collector
Motor housing
Stirring paddle
Pitcher
Serving cover
ON/OFF
switch
Pitcher
spout
Spout
Strainer
Tabs
Post
Pitcher
handle
ON/OFF
switch