


Fig. D
Fig. E
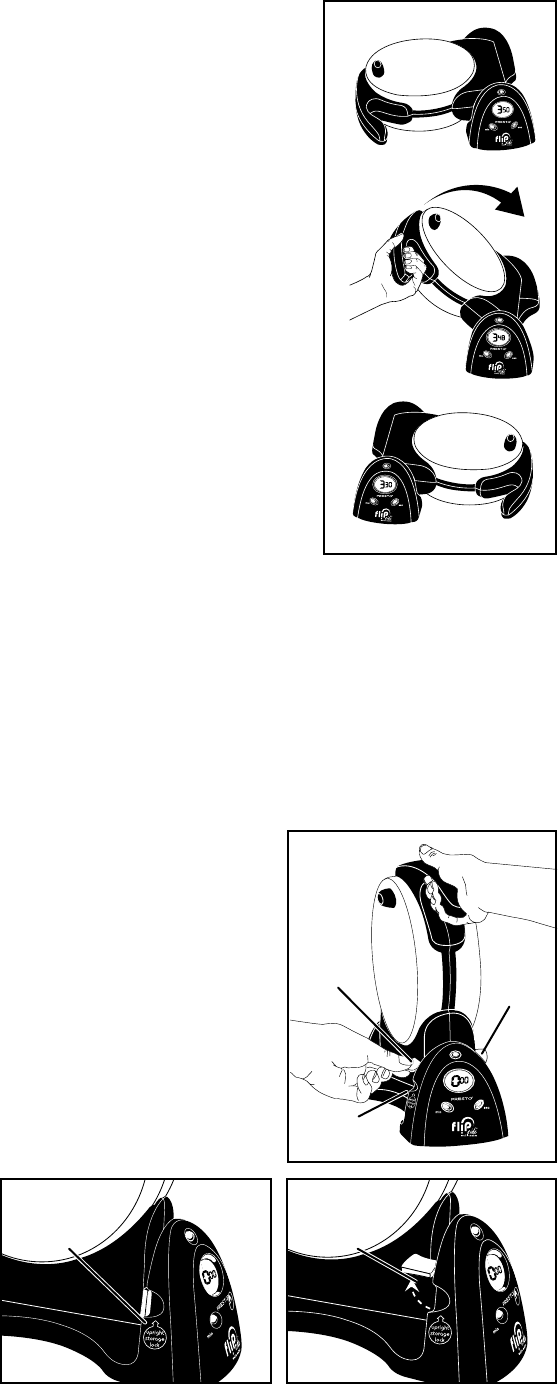
Fig. F
Fig. H
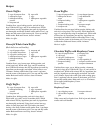
Red locking lever
in UNLOCKED
position
Red locking lever
in LOCKED
position
Fig. I
Fig. G
Red
Locking
lever
Groove in
hinged base
Note: The timer works independently from the unit; it does not turn power to the unit on or off.
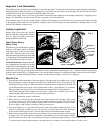
6. Close the waffle maker (Fig. D) and while grasping both handles flip the unit over 180˚ (Fig. E and
Fig. F).
7. The waffle maker will beep several times when the set time has expired. If steam is still noticeable,
continue baking until steaming stops. Open the waffle maker and carefully remove the waffle using
a fork or tongs.
8. Repeat steps 4 through 7 for additional waffles.
9. Unplug waffle maker when cooking is completed.
Helpful Hints
✽ If desired, packaged waffle mixes may be prepared and baked in the Presto
waffle maker. Bat-
ter made from some packaged mixes may have a shorter baking time, so it is recommended that
you check for doneness after 3½ minutes. Note: A good indication that a waffle is done is when
steaming stops.
✽ Waffle batters, whether using mixes or homemade recipes, will vary and therefore the amount
of batter needed for an evenly filled waffle without overflow will vary. It is recommended that
when making the first waffle you use a measuring cup to gauge how much batter is needed.
Generally between ¾ and 1 cup works best. Never use more than 1 cup of batter. If you get some
overflow, be sure to use less batter for the next waffle.
✽ For batters that don’t flow when poured onto the waffle grid, use a heat-resistant spatula and
spread out the batter evenly to the edges of the grid.
✽ No-stick cooking sprays may be used to season the waffle maker. However, the waffle may not have a nice brown appearance
like you get when using cooking oil. Instead, the waffle may have a mottled appearance.
✽ Because the grids are covered with a nonstick coating, there will be only an occasional need to apply vegetable oil or a no-stick
cooking spray. Dessert batters may require an application of vegetable oil or no-stick cooking spray to the waffle grids before
cooking the first waffle and as needed for additional waffles.
✽ Keep waffles warm and crisp until serving by placing them in a single layer directly on a rack in a 200˚ oven.
✽ If you have leftover waffles, freeze them. Cool extra waffles to room temperature. Place them between layers of waxed paper
in a resealable plastic freezer bag and freeze for up to 1 month. When ready to serve, pop the frozen waffles into your toaster
or reheat in an oven at 350˚ for about 10 minutes.
Care, Cleaning, and Storage
1. Unplug unit and allow to cool completely before cleaning. Never immerse waffle maker in
water or other liquid or wash in a dishwasher.
2. Brush any loose crumbs from the waffle grids. Then wipe the grids with a paper towel or
cloth.
3. Should any batter become baked onto the grids or the outside of the unit, pour a small
amount of cooking oil onto the batter. Allow it to sit for a few minutes to soften and wipe
off with a paper towel or cloth.
4. Wipe the outside of the waffle maker with a damp cloth. Do not use steel wool scouring
pads or abrasive kitchen cleaners on the unit.
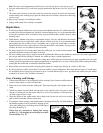
5. For compact vertical storage, rotate waffle maker to upright position (Fig. G). While holding
the handles together, lock in position by flipping up one
of the red locking levers from the grooves in the hinged
base (Fig. H and Fig. I).
Before next use, remember to unlock from storage
position (Fig. I) by dropping the red locking levers back
in towards base (Fig. H).
Red
Locking
lever
3