


2. Locate the two “L” shaped posts (see Fig. A, page 1). Position
the baking pan over the lower heating element at an angle so the
back inside rim of the pan rests against the top of the “L” shaped
posts. Now center the pan so the pan hub is over the drive shaft
(see Fig. B, page 1). The pan must be pulled forward against the
posts for the hub to align with the drive shaft. Lower the pan so
that the drive shaft is seated into the hub. The pan may rotate
slightly while it drops into position, when the hub and drive
shaft engage.
3. Remove pizza from box or wrapper and cardboard disk. Center
pizza on baking pan. When baking take-out pizza or rising
crust pizza, you may use the baking wheel or special baking tray
if provided by the pizza manufacturer.
4. Plug the unit in. The motor will turn on and the baking pan will
begin to rotate. Note: If the baking pan does not rotate, the pan
hub is probably not centered over the drive shaft (see Fig. B on
page 1). Reposition the pan following the instructions in step 2.
5. Slide the heat element selector switch to the appropriate setting
(LOWER–DUAL–UPPER). Refer to the cooking chart in next
column or on back of pizza oven.
6. Turn the timer dial clockwise to the desired baking time. Refer
to the cooking chart (next column) or on back of pizza oven,
rather than the pizza manufacturer’s instructions. Typically, piz-
zas will cook faster on the Pizzazz
®
pizza oven than in a conven-
tional oven. Once the timer is set, the heating elements will turn
on and the pizza will begin to cook. Do not preheat the pizza
oven.
Note: When the heating elements are turned on, the metal sur-
rounding the heating elements will expand. You may hear a light
humming or vibrating sound, or a slight pop, as the metal ex-
pands. This is normal.
7. If timer goes off and additional baking time is needed, simply
reset timer to desired time. To cook 6 minutes or less, turn timer
past “6” and then back to time desired. This will activate the
heating elements and timer function. When pizza appears done,
turn timer to “0” if it is not at “0” already. The heating elements
will turn off when the timer is at the “0” position.
8. Then while the pan continues to rotate, using hot pads carefully
lift the baking pan and pizza off the pizza oven, being careful
pizza does not touch the upper heating element. Set hot baking
pan on a heat resistant surface. Note: As soon as you lift the bak-
ing pan from the pizza oven, the automatic shut-off switch will
shut the pizza oven off.
9. Unplug the unit. Allow the unit to cool before cleaning or stor-
ing.
10. Carefully slide pizza onto cardboard circle or pizza plate. Cut
and serve. Do not cut pizza on the baking pan. For best re-
sults use nylon, plastic, wooden or rubber utensils. Do not
use metal utensils as they may scratch the nonstick surface.
Warnings
NEVER LEAVE UNIT UNATTENDED. Pizza ingredients burn
and smoke when overcooked and in extreme situations may even
ignite. The amount of rising that occurs on rising crust pizzas varies
from pizza to pizza. In rare instances, at the end of the cooking
cycle, a rising crust may rise so high that it touches the upper
heating element, scorching the crust and overcooking the pizza
toppings. Either situation can be avoided simply by turning the
timer dial to “0” before the overcooking/overrising occurs.
DO NOT PREHEAT PIZZA OVEN. With the Pizzazz
®
pizza
oven, no preheating is necessary. Preheating an empty baking
pan may cause the unit to overheat and possibly damage the pan
nish.
NEVER WRAP BAKING PAN OR ANY PORTION OF THE
PIZZA OVEN WITH ALUMINUM FOIL.
NEVER OPERATE THE UNIT IF THE PAN IS NOT
ROTATING.
CLOSE ADULT SUPERVISION IS NECESSARY
WHENEVER USING THIS APPLIANCE WITH CHILDREN
PRESENT.
NEVER TOUCH THE PIZZA OR ANY METAL PARTS ON
THE UNIT WHILE IT IS OPERATING. THEY ARE VERY
HOT.
ALWAYS REMOVE BAKING PAN FROM UNIT WHEN
BAKING IS COMPLETED.
Operating the pizza oven with an empty baking pan or placing an
empty baking pan on the unit before the unit has cooled may result
in damage to the baking pan nish and may also cause overheating
of the unit.
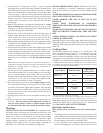
Cooking Chart
The following times are for cooking 9- to 12-inch pizzas. The
times are approximate. If cooking 7- or 8-inch pizzas, you may
need to reduce the cooking times by 1 to 2 minutes. When the
cheese is melted and bubbling, the pizza is done. At the end of the
cooking time if you would like a crispier crust, slide the switch to
LOWER; if you would like the toppings more done, slide the switch
to UPPER. Then reset the timer by turning it past “6” and then back to 1
or 2 minutes and cook until pizza is done to your satisfaction. To avoid
overcooking, do not leave unit unattended.
Type of Pizza Element Setting
Approximate
Cooking Time**
FROZEN (9” – 12”)
Regular Crust
DUAL 12-15 minutes
Rising Crust*
LOWER then
DUAL
10-12 minutes
10-12 minutes
LOWER then
DUAL
Stuffed Crust
7 minutes
12-15 minutes
Regular Crust,
extra topping
DUAL then
UPPER
15 minutes
3-4 minutes
FRESH* (9”-12”)
DUAL 11-13 minutes
*You may use baking wheel or tray, if provided.
**Cooking times will vary depending on household voltage. The higher the voltage
the shorter the cooking time; the lower the voltage the longer the cooking time.
Note: When using the Pizzazz
®
pizza oven, the cooking times will
generally be shorter than if cooking the pizza in a conventional
oven. DO NOT LEAVE UNIT UNATTENDED.
Questions and Answers
When I plug my pizza oven in and set the timer nothing happens.
Why?
1. The baking pan may not be positioned correctly on the unit. In
order for the pan to rotate and the unit to heat, the pan hub must
be seated over the drive shaft (see Fig. B, page 1). Reposition
the pan making sure the hub is on the drive shaft.
2.
It is very likely the unit was overheated at the last use and needs to
be reset. If the baking pan was placed on the unit while it was still
2