10. When not in use unplug the Base from the wall outlet.
Allow the unit to cool completely before cleaning. (See USER
MAINTENANCE INSTRUCTIONS.)
AUTO SHUT-OFF
As an added convenience, your Coffeemaker has been designed with
an Auto Shut-Off feature. When the brewing cycle is complete, after
2 hours, the Coffeemaker will automatically shut-off.
AUTO PAUSE & POUR
Remove the Carafe from the Warming Plate. Always keep the Carafe Lid
on the Carafe.
IMPORTANT: When using the Auto Pause & Pour Feature while the
Coffeemaker is still brewing, the Carafe with Lid must be replaced on
the Warming Plate, under the Filter Basket within (1) one minute to
prevent the Filter Basket from overflowing.
BREWING A SECOND CARAFE OF COFFEE
To brew another Carafe of coffee, turn unit OFF and wait 10 minutes to
allow heating element to cool. While unit is OFF, dispose of used coffee
filter, rinse Carafe and the Removable Filter Basket in water. Place a fresh
filter in Basket. Repeat brewing procedure.
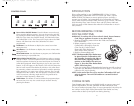
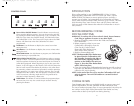
USING THE TIMER CONTROL
Your Coffeemaker has a built in multifunction Timer. The following
sections describe the proper use of the Timer. (See Figure 2.)
SETTING THE CLOCK
To set the clock, press the HR Button until the hour has been reached.
Make sure the proper AM/PM indicator is shown on the left side of the
Digital Display. Press the MIN Button until the minutes have been
reached. You may press and hold the HR or MIN Buttons to display the
correct time more rapidly.
NOTE: Unplugging the unit will reset the clock to 12:00.
PRESETTING THE BREWING CYCLE (AUTO BREW)
To preset your Coffeemaker to begin brewing at a later time, first follow
steps 1 through 6 in the BREWING INSTRUCTIONS section. Check to
make sure that the clock is set to the correct time. If not, follow the above
instructions to set the clock. Press the PROGRAM Button once, the Digital
Display will flash “Program”. Press the HR and MIN Buttons until the
desired future brew time is shown. Make sure the proper AM/PM appears
on the left side of the Digital Display. Press the DRIP Button. The green
AUTO Light will illuminate indicating that the Coffeemaker is now
programmed to begin brewing at the preset time. To cancel the
programmed brew, press the DRIP Button and the green AUTO Light will
shut OFF.
8
BREWING INSTRUCTIONS (CONTINUED)
POLARIZED PLUG
This appliance has a polarized plug (one blade is wider than the
other). To reduce the risk of electric shock, this plug is intended to
fit into a polarized outlet only one way. If the plug does not fit fully
in the outlet, reverse the plug. If it still does not fit, contact a
qualified electrician. Do not attempt to modify the plug in any way.
SHORT CORD INSTRUCTIONS
A short power-supply cord is provided to reduce the risk resulting
from becoming entangled in or tripping over a longer cord.
Do not use an extension cord with this product.
PLASTICIZER WARNING
CAUTION: To prevent Plasticizers from migrating from the
finish of the counter top or table top or other furniture, place
NON-PLASTIC coasters or place mats between the appliance
and the finish of the counter top or table top.
Failure to do so may cause the finish to darken. Permanent
blemishes may occur or stains can appear.
ELECTRIC POWER
If the electrical circuit is overloaded with other appliances, your
appliance may not operate properly. It should be operated on a
separate electrical circuit from other appliances.
WARNING
TO REDUCE THE RISK OF FIRE OR ELECTRIC SHOCK, DO NOT
REMOVE THE BOTTOM COVER. NO USER-SERVICEABLE PARTS
INSIDE. REPAIR SHOULD BE DONE BY AUTHORIZED SERVICE
PERSONNEL ONLY.
COFFEE YIELD
This 12 Cup Coffeemaker yields 12 (5-oz.) cups.
NOTE: A 5 oz. cup is the American industry standard and is used by
most coffeemaker manufacturers.
3
FBW_FCM12SS_IB_5-1-06 1/5/06 3:14 PM Page 7


