5
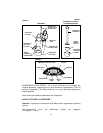
SETTING THE CLOCK
By setting the clock you are able to program the coffeemaker for automatic
brewing any time within the next 24 hours. The clock only needs to be set if
you are going to use the timer for automatic brewing at a later time.
1. Plug into 120 V ~ 60 Hz outlet. The AM is displayed and 12:00 will flash
in the display window.
2. Press and hold for 2 seconds the ‘H’ hour button to set the hour and to
choose AM or PM.
3. Press and hold for 2 seconds the ‘M’ minute button to set the minutes.
Note: If the button is pressed and held the time will advance quickly. Be
certain that the AM and PM are correct when the times are set; otherwise,
the timer will not start at the correct time of day.
Note: The coffeemaker has a 5-second power interrupt feature. If the power
comes back on within 5 seconds, the clock and programmed timer will
resume without needing to be reset.
PROGRAMMING THE TIMER
1. Follow all steps for setting the clock.
2. Press the ‘P’ (program) button.
3. Press the ‘H’ (hours) button, AM or PM, to set hour you want the
coffeemaker to begin brewing the coffee.
4. Press the ‘M’ (minutes) button to set the minutes.
5. Press the ‘AUTO’ (automatic) button; the green light will come on. The
display changes automatically from the programmed start time to the
local time. When the clock reaches the programmed time, the red
operation light will come on and brewing will begin. The coffeemaker can
also be started immediately by pressing the ‘ ’ (ON) button. The green
light goes out and the red light comes on.
Note: The start time is programmed in the timer and can be checked at any
time by pressing the ‘P’ button. To cancel the timer, press the ‘AUTO’ button
again so the green light goes out.
Note: If the start time is programmed, the coffeemaker will repeat the auto-
matic start every 24 hours as long as the ‘AUTO’ button is pressed and the
green light is on.
BREWING
1. Plug into 120 V ~ 60 Hz outlet.
2. Lift up the hinged lid on top of the coffeemaker and slowly add cold
water to desired level using the water level indicator (between 2-10
cups).
3. Make sure that carafe with lid is properly seated on warming plate.
4. Fold the perforated edge over on a #4 cone-shaped paper filter into
removable liner and add coffee grounds. Use approximately 1 measur-
ing spoon of grounds for every cup of coffee. Close the lid.
5. If brewing less than 5 cups of coffee, press the Brew Strength Selector
button. A cup will appear in the window.
6. Press the ‘ ’ (ON) button; the red indicator light will turn on.
7. If you wish to serve a cup of coffee before brew cycle is complete –
“Pause and Pour,” – simply remove carafe from warming plate. Dripping
will automatically cease. Return carafe to position on warming plate
within 30 seconds; dripping will resume.


