


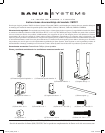

ENGLISH
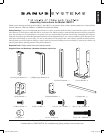
For assembly information for the VMSA, VMAA, VMAA18 and VMAA26 see the Steps 1 through 6. For assembly
information for the VMDD and VMDD26 see Steps 7 through 12.
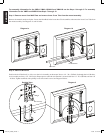
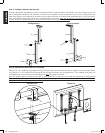
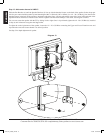
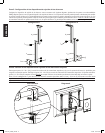
Step 1: Remove mount from Wall Plate and remove lower Cross Tube from the mount assembly.
Remove the mount from the wall plate. Loosen the Allen Bolts in the lower three Vise Assemblies and remove the lower Cross Tube from
the mount assembly. See Diagrams 1a and 1b below.
Diagram 1a Diagram 1b
vise assemblies
cross tube
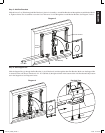
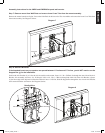
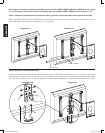
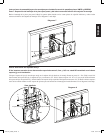
Step 2: Add Axis Brackets
Position the Axis Bracket (d) so it fits over the Axis Assembly on the mount. Insert a 1/4 - 20 x 5/8 Bolt (k) through the Axis Bracket,
Axis Assembly and into a 1/4 - 20 Nut (m). Repeat process until the Axis Bracket is secured with four 1/4 - 20 x 5/8 Bolts and four 1/4
- 20 Nuts. Tighten each Bolt with a phillips screw driver until secure. See Diagram 2 below.
Detailed View Diagram 2
m
k
axis assembly
d
VMCC1ins_010606_ML.indd 4 1/16/06 10:31:53 AM